Total
Legal Accounting 3
SECTION
1.3.2.2 - GENERAL CHEQUES
USAGE: To pay monies for Clients for non-Trust related
transactions. Only General Bank accounts may be access from this program.
Cheques may be dissected amongst several files, if required. This program is
used for amounts that are to be withdrawn from a General account, eg Couriers.
DISCUSSION: Normally, only cheque amounts are entered her. It
is unlikely that cash or credit card payments will be made from a this kind of
transaction. Because of this, the name of the function is “General Cheques”
rather than “General Payments”. As a result of this, the discussion that
follows will assume cheques only.
When you start the GENERAL CHEQUES program,
T.L.A. initially asks:
ENTER
CHEQUE TOTAL [__________$0.00 ] (INC GST)
Here you enter the total value of the Cheque to be
drawn (including any GST component). The value entered must not be zero, however,
it may be negative if you are reversing a previous entry.
Next you will be asked for the GST component of the
transaction, as follows:
GST
VALUE [__________$0.00 ]
This amount may be zero but must not exceed the
value of the CHEQUE TOTAL. It must also be the same sign as the CHEQUE
TOTAL.
Next you are asked which General Bank Account the
monies will be deposited into:
POST TO
BANK ACCOUNT [ ]
Enter the last four digits of the bank account and
press <Enter> or <F10>. If you have only one account, set this GENERAL
LEDGER CONTROL ACCOUNTS (see SECTION 6.5.2) to
save time. If you have multiple General accounts, you may press <F9> to initiate a search.
Typically, the screen will now look like this:
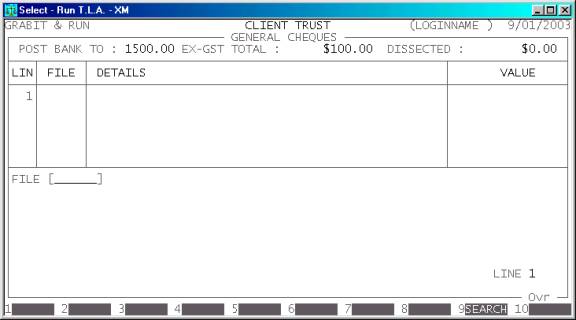
The top of the screen displays the General Bank
account you are posting to, the total ex-GST value of the payment and the value
dissected so far. At this point the total dissected is zero. T.L.A. will not
allow you to update the Cheque until the Dissected value is exactly equal to
the Total value.
Enter a Client code and press <Enter>. Alternatively, press <F9> to initiate a search. The
Client file you enter must refer to an active (not completed) file. It is
possible to enter a transaction that makes the Client balance negative (in
credit).
The screen will now typically look like this:
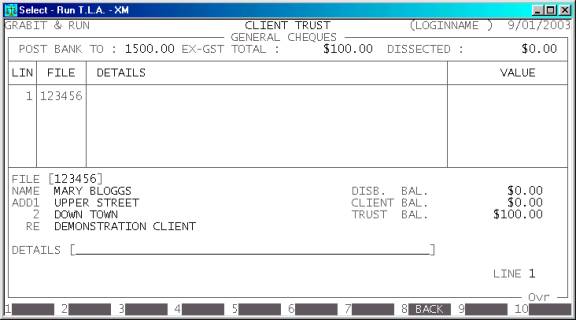
T.L.A. will display the Name of the File, the
Address and Matter Re. Also the current Disbursement, Client and Trust balances
are displayed on the left of the screen. These balances are updated when monies
are applied to show you what the account will be when the current transaction
is updated. This can be a useful check. You should look at these balances
before updating the line.
There are several fields to enter:
Name Comments
DETAILS Here you enter the details of the transaction, eg. COURIERS. If you are entering multiple lines, you can repeat
the previous line by pressing <F1>. This repeat function will
remain live until you exit to the menu program.
VALUE This is the value (ex-GST) of the line. It might be
the full non-GST value of the Cheque or the portion to be dissected to the
current file. You may not enter a value that would cause the Cheque to be over
dissected. You may press <F9> to open the on-screen
calculator. The result of the calculation will be automatically inserted into
this field.
At each point, you may cancel the CHEQUE
by pressing <ESC>. However, it is possible to
return to a specific field by using <CsrUp> or <F8>.
If you have entered at least one line, you may press
<F5> (at the FILE field) to enter the REVIEW
function. This function allows you to view your entries, and if necessary
change or delete a line. To move between lines use <CsrUp>, <CsrDn>, <PageUp>, <PageDn>, <Home> and <End>. If there is a particularly
large number of lines, you can also use <F9> to go to a specific line
number. To modify a line, make sure it is displayed in full in the bottom
window and press <F3>. You can then re-enter any
of the details. To leave the REVIEW function, press <ESC> or <F10>, once.
To end your lines, press <F10>. You will be asked to confirm that you have
finished entering lines and then you will be asked certain trailer information.
In some states, certain fields may be turned off or be inaccessible. A Complete
list follows:
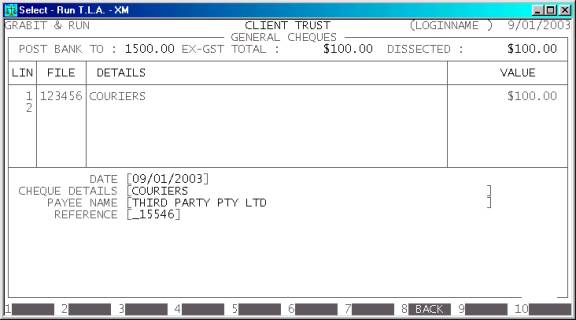
DATE This field
defaults to today’s date (as per the date at the top right-hand-corner of your
screen. You may change it to any valid date within the calendar (as defined in SECTION 7.1.6.) You may also return the date to today’s
date by pressing <F1>. Note that this date has an effect on clearance dates. You should
enter the date you received the monies.
CHEQUE DETAILS This field
will be printed on the remittance portion of the Cheque. The default is the
description of the first line but you can change it to any 50 character string
that generally defines the reason for the Cheque.
PAYEE NAME This field may be left blank
but it is generally filled in if the Cheque is being made out to someone other
that the name on the file.
REFERENCE This field will default to
the last reference number you entered, plus one. Depending on your settings in SYSTEM
DEFAULTS (see SECTION 7.1.2) you may be able
to change it to a different, non-zero value. The largest value available is 999999.
The screen will typically look like this:
At every point you can press <CsrUp> or <F8> to return to the previous
field.
At the end of the CHEQUE you will be asked to confirm the update. This is the point
of no return. Once you answer Y, T.L.A. will update all the relevant files. Up to this point you can
cancel or modify the details. After you have updated the CHEQUE, you can only remove it by entering a negative CHEQUE i.e. the same entry but with a negative value.
If you have enabled the printing of cheques, T.L.A.
will offer to print a cheque now. This is your only opportunity to print the
cheque. Afterwards, you will be returned to the Cheque Value entry screen where
you may either enter another CHEQUE
or press <ESC> to return to the TRUST DATA ENTRY MENU.
Files updated by the General Cheque program:
Client/Trust
master-file: The individual
dissections are added to the Disbursement balance.
Client/Trust
transaction file: Each Cheque generates a
transaction. This can be viewed in CLIENT/TRUST
ENQUIRIES and is used to create reports, such as CLIENT STATEMENTS.
Reconciliation
File: Each Cheque is posted to the
Reconciliation File to be later compared with the Bank statement.
General
Ledger master-file: The General Bank
account is updated with the value of the Cheque.
General
Ledger transaction-file: A
transaction is posted for the total value of the Cheque.
Audit
transaction-file: Each
dissection creates a line in the Audit file, which can then be printed in the AUDIT
TRAIL.