Total
Legal Accounting 3
SECTION
1.3.1.4 - THIRD PARTY CHEQUES
USAGE: To register a cheque that you have on-sent to a
third party without first depositing in your bank accounts. You can also use
this function to transfer a Securities Cheque to a third part.
DISCUSSION: There is no net effect on any balances unless you
involve a Securities file. Beyond this, the transaction is purely documentary,
however required by the Law Institute. Although possible, this function is
rarely used for anything but Cheques.
When you start the THIRD PARTY CHEQUES
program, T.L.A. initially asks you for a Trust file number. If you cannot
remember the file number, press <F9> to initiate a search. T.L.A.
will check that the code does not refer to a Trust file that is closed.
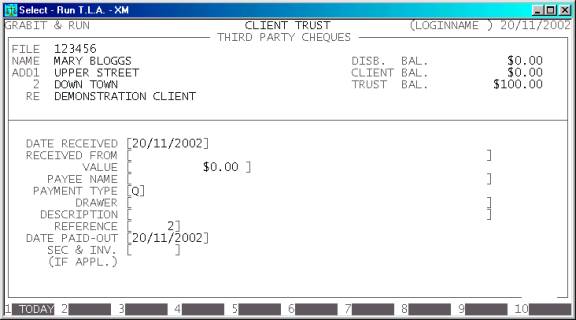
Typically, the screen will now look like this:

The file will be displayed with its corresponding
Name, Address and Matter Re. Also the current Disbursement, Client and Trust
balances are displayed on the left of the screen.
Next you must enter the details of the transaction.
These fields are required by the Law Institute.
There are several fields to enter:
Name Comments
DATE RECEIVED This field defaults
to today’s date (as per the date at the top right-hand-corner of your screen.
You may change it to any valid date within the calendar (as defined in SECTION 7.1.6.) You may also return the date to today’s
date by pressing <F1>. You should enter the date you actually received the Cheque.
RECEIVED FROM This is the
name of the party you received the Cheque from. It is not necessarily the same
as the DRAWER.
VALUE This is the value of the Cheque. This amount can be
negative if you are reversing a previously incorrect entry.
PAYEE NAME This is the name of the
party for whom the Cheque is for. The assumption is that you will actually pass
the cheque onto that party
PAYMENT TYPE This defines the type of payment.
Normally it is Cheque and this is by default a type Q.
DRAWER This is the name of the
Drawer on the Cheque.
DESCRIPTION Here you enter the purpose of the Cheque, eg. SETTLEMENT.
REFERENCE This field will default to
the last reference number you entered, plus one. Depending on your settings in SYSTEM
DEFAULTS (see SECTION 7.1.2) you may be able
to change it to a different, non-zero value. The largest value available is 999999.
DATE PAID-OUT This field defaults to
today’s date (as per the date at the top right-hand-corner of your screen. You
may change it to any valid date within the calendar (as defined in SECTION 7.1.6.) You may also return the date to today’s
date by pressing <F1>. You should enter the date you actually transferred the Cheque
to the PAYEE.
SEC & INV. This field is only required
if the Cheque being transferred is either coming out or being paid into a
Securities file. In this case, enter the code of that file here. If you cannot
remember the code, press <F9> to initiate a search.
At each point, you may cancel the third
party cheque by pressing <ESC>. However, it is possible to
return to a specific field by using <CsrUp> or <F8>.
At the end of the THIRD PARTY CHEQUE you will be asked to confirm the update. This is
the point of no return. Once you answer Y, T.L.A. will update all the relevant files.
Up to this point you can cancel or modify the details. After you have updated
the THIRD PARTY CHEQUE, you can only
remove it by entering a negative THIRD
PARTY CHEQUE i.e. the same entry
but with a negative value.
Files updated by the Third Party Cheque program:
Client/Trust
master-file: The last Trust
transaction date is updated.
Client/Trust
transaction file: Because of the large
amount of information contained in this type of transaction, T.L.A. creates two
entries in the transaction file, a Third Party Receipt and a Third Party
Cheque. These cancel each other’s value and are always printed together in
transaction reports.
Audit
transaction-file: Each
transaction creates a line in the Audit file, which can then be printed in the AUDIT
TRAIL.