HiFinance
5
SECTION
7.1.5 - CONFIGURE PRINTERS
USAGE: To display the current
printer drivers; to add new printer drives or modify the existing drivers.
DISCUSSION: Initially HiFinance is
delivered with some 30 different printer drivers. Each driver describes, to the
report programs, how to make each particular printer engage functions, such as
expanded print and condensed print. Printer definitions apply globally, that
is, an Epson FX80 definition by one user is seen by all users who use the
printer. Changes made here take effect immediately. The entries here are based
on DOS style printing. This also corresponds to the PCL5 printing style used in
HP (and compatible) printers. Drivers defined here will not work with,
so-called, Windows printers because they will only print graphical character
sets. It is, however, possible to download (from the Internet) drivers that
translate the standard printing, HiFinance uses, into the graphical printing
style.
It should be noted, here, that PCL6 is not an update
to PCL5. It is a completely different driver definition. Printers that can only
use PCL6 will not work here. Most printers can have a PCL5 driver, even if it
is not standard in the out-of-the-box configuration. Before purchasing
printers, for use with HiFinance, please make sure that they are the correct
type. If you are not sure, please contact your dealer or Horizon Information
Systems for advice.
When the program starts a menu is displayed which
looks like this:
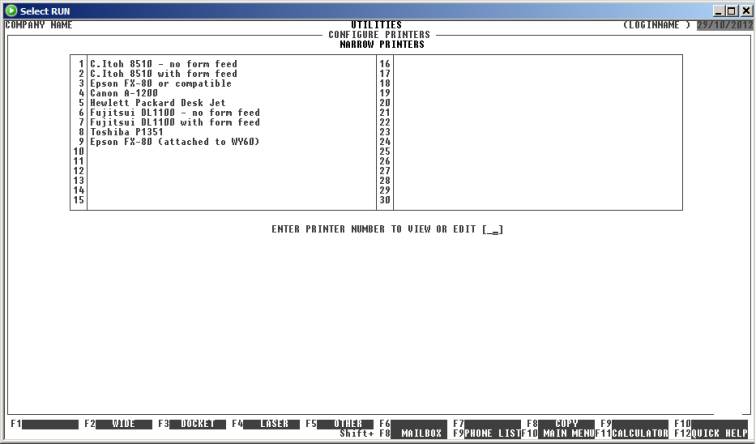
The screen displayed above shows the list of narrow
printers currently defined on your system. The exact list may vary with
different releases of the software. You may choose from the following
functions:
1-99 This will display the full definition for the
printer number you choose. From this screen, you may modify, or just view, the
printer’s defined parameters.
<F1> This will move you to the NARROW PRINTERS screen. There is space for 30 narrow printer
definitions. The term narrow printer refers
to printers that hold a maximum width paper of 10”. They print to a maximum
width of 8”, ie when printing 10 cpi (characters per inch) they can print 80
columns across the page. HiFinance will automatically force these printers to
17 cpi for wide reports (requiring 132 columns).
<F2> This will move you to the WIDE PRINTERS screen. There is space for 15 wide printer
definitions. The term wide printers refers
to printers which hold a maximum width paper of 15”. They print to a maximum
width of 13.2”, ie. when printing 10 cpi (characters per inch) they can print
132 columns across the page. As no report in HiFinance uses more than 132
columns, wide printers always print in 10 cpi characters.
<F3> This will move you to the DOCKET PRINTERS screen. There is space for 15 docket printer
definitions. The term docket printers refers
to printer that are usually attached to a cash draw. These are used with the
POS options in HiFinance. These printers are normally 2 or 4 inches wide. Provision
is made for escape sequences for opening the cash draw and also for cutting the
paper, if the printer has these attributes.
<F4> This will move you to the LASER PRINTERS screen. There is space for 30 laser printer
definitions. Laser printers hold A4 paper only. They can only print to a
maximum width of 7.8” and some do not force the next page properly. HiFinance
can cope with most laser printers but there are usually restrictions. Laser
printers require more parameters than other printers do. Check with your dealer
before using a laser printer as your main reports printer.
<F5> This will move you to the OTHER PRINTERS screen. There is space for 19 printer definitions.
This screen is usually restricted to printers such as daisy wheel printers
and special printers that do not fit into the other three categories. If you
wish to print directly to disk, you may also wish to use one of these
definitions. By leaving all the attributes blank, HiFinance will basically just
send a dump of the report to disk.
<F8> This option allows you to copy a printer setup to a
new number. This is useful when you wish to setup a special driver that is
similar to an existing printer. For instance, if you have a Laser printer that
normally prints on A4 sheets but you wish to print some reports on A5, you can
duplicate the existing driver to a new number and then just change the fields
that are different. When you choose this option you will be asked to enter the
“old” number, “new” number and a description of the new driver. After
confirmation, HiFinance will copy the fields to the new printer number and
redisplay the screen.
<ESC> This will return you to the PRINTERS & SCREENS MENU without further updating your control
files.
Modifying a printer set-up
When you choose to modify a printer, the screen
displays several fields. These are described below. For each printer function
there is a corresponding set of up to 20 numeric fields. Each field must be
filled with a number from zero to 255. These numbers define, in decimal, the
ASCII character to be sent to the printer. If there are more fields than
necessary, leave the extra ones as zero. Eg. expanded print is initiated on a
Canon A2 printer with the sequence of three characters, ›1m. To enter this use the decimal sequence: 155, 49, 109, 0, 0, 0, 0, 0, 0, 0, 0, 0, 0, 0, 0, 0, 0, 0, 0, 0.
The printer options are:
PRINTER NAME This field is documentary
only, but if left blank, the printer becomes undefined and will not be accepted
ASSIGN LOCAL PRINTERS. The field is used
to identify the printer you are establishing. This name appears on the main
screen, above, and when defining local printers. See also SECTION 7.1.3.1 - ASSIGN LOCAL PRINTERS, for
further details.
START EXPANDED PRINT This defines the control sequence required to turn
the printer into 5 pitch or 5 character per inch (cpi). Often this is just
defined as shift-out however with some printers
it is necessary to completely define the sequence. This function is almost
exclusively used for making printing stand out. If you leave this function as
all zeros, heading will still print but will not be expanded. If your printer
cannot print 5 cpi, try inserting the sequence which turns-on bold printing. If
you do this, make sure you enter the corresponding sequence for cancel expanded
print, below.
CANCEL EXPANDED PRINT This defines the control sequence required to turn
off expanded
print. Often this is the same sequence as rESTORE normal print, but some printers need a specific
sequence.
START COMPRESSED PRINT This defines the control sequence required to turn
on compressed
print. This must be at least 16.6 cpi. This function is not required
for wide printers and can be left as all zeros. Most printers have an option to
shift-in, which changes them into 17
cpi. Note that laser printers are only capable of printing to 7.8 inches across
the page. This means that 17 cpi is not adequate. 20 cpi is acceptable but
might be hard to read. It is possible that your printer can be set to some
other value, eg. 18 cpi. In either case, you must be able to print 132
characters across the page for all reports to work correctly.
CANCEL COMPRESSED PRINT This defines the control sequence required to turn
off compressed
print. Often this is the same sequence as restore normal print,
but some printers need a specific sequence.
START 12PITCH PRINT This defines the control sequence required to turn
on 12 cpi printing. This function is rarely used in HiFinance and may be
ignored unless you have special printing requirements.
CANCEL 12PITCH PRINT This defines the control sequence required to turn
off compressed
print. Often this is the same sequence as restore normal print,
but some printers need a specific sequence. This function is only required if
you have defined the start 12pitch print sequence.
START UNDERLINE PRINT This function is not always available for all printers and
does not always work in combination with certain other printing styles.
Consequently, HiFinance does not use this sequence in standard reporting.
However, it is included because there are some sites that have specific
requirements and have printers that can use this function.
CANCEL UNDERLINE PRINT If you define UNDERLINE PRINTING, you should also include
the sequence that cancels it.
START BOLD PRINT This function is not always available for all printers and
does not always work in combination with certain other printing styles.
Consequently, HiFinance does not use this sequence in standard reporting.
However, it is included because there are some sites that have specific
requirements and have printers that can use this function.
CANCEL BOLD PRINT If you define BOLD PRINTING, you should also include the
sequence that cancels it.
START REVERSE PRINT This defines the control
sequence required to tell the printer
to start scrolling the paper backwards. This function is rarely used in
HiFinance and may be ignored unless you have special printing requirements.
START FORWARD PRINT This defines the control sequence required to tell the printer to resume scrolling
forwards. This function is only required if you have defined the start
reverse print sequence.
RESTORE NORMAL PRINT This defines the control sequence required to turn the
printer back to 10 cpi without any special printing attributes, eg. bold,
underline, etc. Sometimes this is just a single sequence. With other printers
it might have to be a combination of the other cancel functions from above.
START LANDSCAPE PRINT This defines the control sequence required to turn
laser printer into landscape printing.
This field is only relevant to laser printers.
CANCEL LANDSCAPE PRINT This defines the control sequence required to reset landscape
printing back to portrait printing. This sequence is
only needed if you have defined the landscape PRINTING sequence.
USE TRAY 1 - 4 For some special printing functions, it may be necessary to force
the printer to use a specific tray, eg to print on specific coloured paper.
Standard HiFinance reports do not use this function, however, it is included
for special modifications for certain sites. Please note that some printers
will automatically return to tray-1 when the print job is complete, however
some need to be specially forced into this mode. If you need to force a return
to tray-1, add the code into RESTORE NORMAL PRINT.
USE A3 This option is used in certain sites to print very wide
reports. If you define both A3 and LANDSCAPE PRINTING, the page
is the same length as A4, but is some 260 characters wide. To use this
function, special modifications need to be added. This is not part of standard
HiFinance. Please note that some printers will automatically return to A4 when
the print job is complete, however some need to be specially forced into this
mode. If you need to force a return to A4, add the code into RESTORE NORMAL
PRINT. Note that some high end printers will automatically change trays if
you force the use of A3.
USE A4 This function is rarely used. It is only required if a
special report requires a change of paper size half way through the report. All
standard HiFinance reports are A4, by default.
USE A5 This option is used in certain sites to print very short
reports, eg small picking-slips. To use this function, special modifications
need to be added. This is not part of standard HiFinance. Please note that some
printers will automatically return to A4 when the print job is complete,
however some need to be specially forced into this mode. If you need to force a
return to A4, add the code into RESTORE NORMAL PRINT. Note that some
high end printers will automatically change trays if you force the use of A5.
BELL / OPEN DRAW This function is normally just character 7. Virtually all cash
draws will open when their attached printer receives a bell character.
If your docket printer requires a different sequence, you may enter up to 20
characters, here.
CUT PAPER This function is only relevant for Docket printers that have a
built in cutter. Some printers have the option to either completely cut or
partially cut the paper. Only one option can be entered here. If you leave the
options completely blank, the cutter will not be activated.
LINES ON STANDARD
(PORTRAIT) REPORT This tells the report programs how long your report page is. Usually
this should be set to 66 but for true A4 paper, use 70. Some laser printers
require other odd numbers of lines, eg. Canon A1 require 67, HP LaserJet 6L
requires 64. Experiment with this number until you get each report starting its
print at the same line on the each page. This number only refers to standard
reports, such as DEBTOR Reports, Trial Balances, etc. It has no
effect on Receipts, Cheques, but has an affect on
some INVOICE formats. Check with your
dealer for details.
LINES ON LANDSCAPE REPORT This tells
the report program how long your report page is when printing in landscape.
This field is only relevant for laser printers. Usually this should
be set to 44 or 48 depending on your laser printer. Experiment with
this number until you get each report to start printing at the same line on the
each page. This number only refers to standard reports, such as DEBTOR
Reports, Trial Balances, etc. It has no effect on Receipts,
Cheques, etc.
LINES AT BOTTOM OF REPORT There are up to 2 instances of this field. They correspond
with the Portrait printing and the other to Landscape printing. These should be
set as low as possible for you printer. However, zero is not usually a good
option. It can confuse the printer.
LINES AFTER DOCKET If you are defining a Docket printer, it is often useful to push
out the docket after the printing has finished. Some printers do this
automatically, but most require you to either manually roll the paper up till
it can be torn off, or have the program do it for you. Often the number
required here is 6 or 10, however, a bit of experimenting will soon define the
number of lines required. It is especially important to set this option
correctly if you intend to use a printer with an automatic cutter.
START RGB COLOUR PALLET If you are using a colour printer, some reports can print in
colour. Here you can enter the codes required to shift to any one of 8 RGB
colours. If you enter any of these, make sure you enter the code for BLACK. Otherwise, reports will move into a colour and
never change back to black. Also, please note that some colours make more sense
than others. Eg Printing white on white paper will not normally be readable.
The screen also offers the following function keys:
<F5> This will allow you to test your entries by printing
to the printer. You will be asked to enter a printer-port (eg. PRN or prin1) to print to, as at this
point, HiFinance does not know where you intend to connect your printer. This
must be entered the same way as you enter the port name in SECTION 7.1.3.1- ASSIGN LOCAL PRINTERS. It
is not necessary to save your changes before printing, but it is recommended as
printing to a non-existent port may cause the program to abort.
<F10> Press <F10> when you wish to save the
changes you have made. You will be required to confirm your selection.
<ESC> This will return you to the previous screen without
updating your control files.