HiFinance
5
SECTION
7.1.3.3 - CHANGE PATHS
USAGE: To change the search path used by HiFinance to
find your data files, ie. to tell the
system where to look for information.
DISCUSSION:
HiFinance places all data files in a directory
structure, usually \HF5DATA in DOS and /u/hf5data in UNIX. Your local control file FHIF01.DAT stores the path to that data. The current function
may be used if you wish to permanently change your path to a different
directory or drive. This function is normally only used when directed by
support staff or your dealer.
The following prompts will appear:
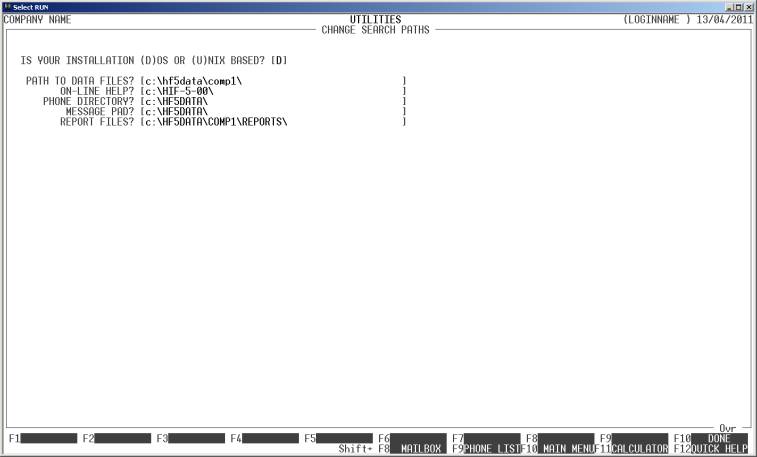
IS YOUR INSTALLATION
(D)OS OR (U)NIX BASED? This must be answered with a D or U, in upper or lower case.
For windows based installations, also choose D.
PATH TO DATA FILES? In DOS based installations, this is usually h:\hf5data\comp1\, where comp1 might be
replaced with an abbreviation of your company’s name. In UNIX, the default is /u/hf5data/comp1/. It should be noted that the data-path is
normally overridden by the start batch file and any changes you make to this
field will only affect your terminal and only until you log off.
ON-LINE HELP? This is normally your program directory. The files PHIFHELP.DAT and IDX are normally found there.
In DOS based installations, this is usually h:\hf5prog\. In UNIX, the default is /u/hf5prog/.
PHONE DIRECTORY? This is normally in your base data directory. In DOS based
installations, this is usually h:\hf5data\. In UNIX, the default is /u/hf5data/. You might choose to place
the phone directory in a separate directory so that it can be backed-up with
your word-processing files, for instance. You might also choose to have a
personal phone directory rather than pointing to a communal one. In this case,
point this field to your log-in directory which is usually H:\hf5DATA\USER01\ in DOS and /u/hf5data/user01/ in UNIX, where user01 is often replaced by an abbreviation of your log-in
name.
MESSAGE PAD? This is where HiFinance stores the mail information. It is not
necessary to create a personal directory as the file separates messages by user-code.
The file is normally in your base data directory. In DOS based installations,
this is usually H:\hf5data\. In UNIX, the default is /u/hf5data/.
REPORT FILES? This is the directory that holds reports that are saved to disk.
(See SECTION 7.1.8.)
Usually these are saved in a directory under the data directory. In DOS based
installations, this is usually H:\hf5data\comp1\reports\, where comp1 might be replaced with an abbreviation
of your company’s name. In UNIX, the default is /u/hif4data/comp1/reports/. There is normally a separate reports directory for each company setup, however you can change
this if you desire. Note that the REPORTS directory must exist or the
reports function will fail.
REPORT SERVER FILES? This field is only required if you are using the REPORT
SERVER option. This option allows you to fax or email invoices, etc. The
default directory for this function is H:\HF5DATA\REPSVR\XML. Only one directory is
required for as many companies as you might have setup. You must set the Data
Path Directory, in the report server, to the same path. Also, you should set
the other directories to be within this path. Note that there must be a
structure within the path. There must be an XML directory with ARCHIVE and BADFILE sub-directories attached.
Without this, the REPORT SERVER will fail to operate correctly. If you
are not using the REPORT SERVER, this field may be left blank. Note that
this field is global to all users.
Note that DOS is not case sensitive but UNIX is.
Also note that you must enter the final slash / or \ or
HiFinance will not find the data.
Note also that the above defaults are relevant to
single-company installations. To keep data-files separate, multi-company
installations might be setup differently. Similarly, in multi-terminal
installations, only one terminal will see
the files on drive C:,
all others will have to see them as a
network drive, eg. F:
To exit from this screen, press <ESC> and you will be returned to the USER DEFALTS MENU.
When you wish to permanently commit the changes to
disk, press <F10>. You will be asked to
confirm your action. You will then be returned to the USER DEFAULTS MENU.