HiFinance
5
SECTION
2.3.1 - PURCHASES
USAGE: To enter the purchase of goods and services,
usually from your supplier’s invoices. Purchases can be either entered here or
converted from PURCHASE ORDERS
previously entered. (See SECTION 2.3.7.)
DISCUSSION: When you start the PURCHASE program, the
computer will initially ask for a Creditor code. Insert the code and press <Enter>.
To return to the CREDITOR DATA ENTRY MENU, press <ESC>.
To search for a Creditor, press <F9>. For further details on searches, see SECTION 1.2.
Having chosen a Creditor, the screen will display
the name and address and recent balances, in full at the top of the screen.
You will then be asked a series of questions. These
relate to the ribbon information on the PURCHASE.
The exact list of fields displayed depends on how you have chosen the options
in SYSTEM DEFAULTS. (See SECTION 7.1.2.)
Fields that are not displayed take their values from the defaults set on the
Creditor’s master-file.
Note that if there are any active Purchase Orders
for this Creditor, you will be asked, PROCESS
PURCHASE ORDERS?
If you answer Y, you will be presented with
a list of active Purchase Orders. Choose from this list and the PURCHASE will be preloaded with the
details. If you have chosen to allow multiple Purchase Orders in Purchases, you
will then be asked if you wish to attach another Purchase Order. If
you enter Y, you will be able to enter
another number. You can do this up to a maximum of 10 Purchase Orders.
While you are entering the purchase, the orders will be treated as if they were
one.
The following is a complete list of possible fields:
Name Comments
DATE This defaults to the system date (the date at the
top of the screen). If you change it, HiFinance will retain the changed date
until you exit to the CREDITOR DATA
ENTRY MENU. If you have changed the date and wish to return to the system
date, press <F1>. This field will not be
displayed here if you have chosen to allow the expected date to be entered on
each line (see SECTION 7.1.2).
THEIR INVOICE # This is a compulsory field. Here you enter the invoice
number from your supplier. It is an alphanumeric field. If there is no invoice number,
you can enter the date or some other reference. If you do not have the actual
invoice but you know what you will be charged, you can still enter the purchase
by entering a generic string here, eg. TO
BE ADVISED or TBA. Later you can pickup the purchase in CREDITOR TRANSACTION ENQUIRIES
and modify the string.
OUR ORDER # This is a non-compulsory field. If you have purchased the goods via
an order, you can enter the order number here as a reference. This helps to
keep all the information in one place.
CREDITOR’S NAME If you are purchasing from the Creditor SUNDRY, HiFinance will ask you to enter the actual name of
the Creditor. The Sundry Creditor is treated differently from other Creditors
in that it can be singled out for exclusion in certain reports. The modified
name will be displayed in CREDITOR
ENQUIRIES but will not be saved to the Creditor master-file record.
At each point, you may cancel the PURCHASE
by pressing <ESC>. However, it is possible to
return to a specific field by using <CsrUp> or <F8>.
After answering these fields the screen will repaint
and display as follows. Note that at this point there is no way to go back to
the above questions, except by cancelling the PURCHASE and starting
again.
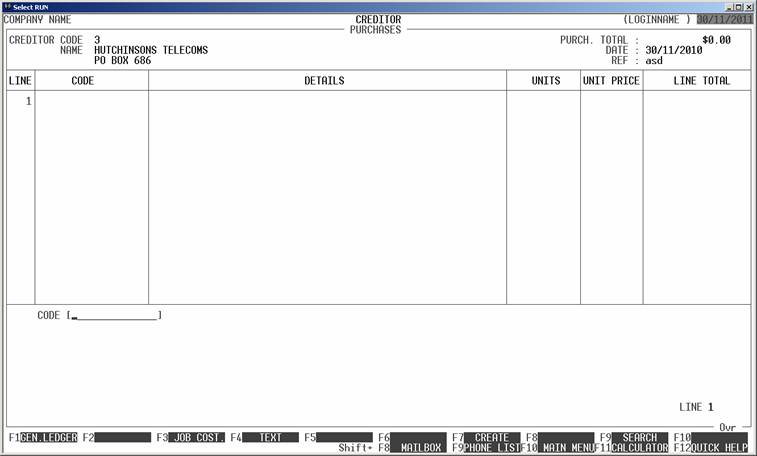
Here you may enter the complete details of each PURCHASE line. You can also change from
entering an Inventory line to a General Ledger line or Job Costing line (if
enabled). The fields displayed depend on which type of line you are entering
and what options you have set in SYSTEM
DEFAULTS. For Inventory lines, the following fields will be asked:
CODE This is the Inventory Code. You may enter a code
here or press <F9> to initiate a search. You
can also use <F7> to jump directly to the INVENTORY ADD routine. There you can
add a single Inventory Item and the return to the current function. This is
useful for companies that buy new products on each Purchase. You can change to
a different kind of entry by choosing a function key. If you choose to enter a
General Ledger line, HiFinance will remember the last code you entered (as long
as you do not exit the program). If the last line was not zero, you can repeat
the last line by pressing <F1>.
DETAILS Here you have 2 lines to enter the description of
the item. By default, HiFinance will insert the description as it appears on
the master-file. If you choose to enter a General Ledger line you can only
enter one line of description, however, HiFinance will remember the last
description you entered (as long as you do not exit the program). If the last
line was not blank, you can repeat the last line by pressing <F1>.
UNITS You may enter any number of units, with up to 3
decimal places.
PRICE If you need to calculate the price, you may use <F9> to launch the calculator. The result of the
calculations will be automatically inserted into this field. If you wish to
insert the last purchase price, press <F1>. If you are using the
Foreign Currency option, <F1> will insert the last
Foreign Currency price. If you are not entering in Foreign Currency, you will
also have to option to press <F2> to enter the Standard
Purchase Price.
TOTAL HiFinance will automatically compute the line total.
If the price was zero, you will be able to enter a sale price here. This is the
total line value. If you choose to enter a value here, the discount will
be set to zero and HiFinance will automatically compute the unit price.
DATE This field will only be displayed if you have chosen
to allow the expected date to be entered on each line (see SECTION
7.1.2). The date will default to the date on last line entered.
At each point you may press <ESC> to abort the line or the whole transaction.
If you have entered at least one line, you may press
<F5> (at the CODE field) to enter the REVIEW function.
This function allows you to view your entries, and if necessary change or
delete a line. To move between lines use <CsrUp>, <CsrDn>, <PageUp>, <PageDn>, <Home> and <End>. If there is a particularly large number of lines,
you can also use <F9> to go to a specific line
number. To modify a line, make sure it is displayed in full in the bottom
window and press <F3>. You can then re-enter any
of the details. To leave the REVIEW function, press <ESC> or <F10>, once.
To end your lines, press <F10>. You will be asked to confirm that you have
finished entering lines and then you will be asked certain trailer information.
Most of these fields may be turned off. A Complete list follows:
PAYMENT DUE DATE HiFinance will automatically insert a date for you, which you
may override. Note that the day is computed and displayed as you leave this
field. You will be warned if you have chosen a date that falls on a weekend. No
separate calculation is made for public holidays.
If you are entering a PURCHASE from a PURCHASE
ORDER, you will be asked if the order is complete. It is very important to
understand the implications of this question. The PURCHASE may not
contain all of the lines on the PURCHASE ORDER. Some lines might be
modified and some lines added. If you answer Y to the
question, all HiFinance will clear the UNITS-ON-PURCH-ORDER field on every line (on the
order) irrespective of whether the items have been received or not. The order
will be tagged as complete. Use this option when the order has been completely
delivered or when you do not expect to get any more of this order. If the order
has been partially received, answer N. This will update the lines
on the purchase that correspond with lines on the order but the rest will be
written back to the order as undelivered. The order will remain marked as
active. If you are entering multiple orders, you will be asked this question
once for each order. When you try to import a partially received order, only
the undelivered portion will be loaded into the PURCHASE.
At the end of the PURCHASE, you will be presented with a summary and you will be
asked to confirm the update. This is the point of no return. Once you answer Y, HiFinance will update all the relevant files. Up to this point you
can cancel or modify the details. After you have updated the PURCHASE, you can only remove it by
entering a RETURN.
After the PURCHASE you will be returned to
the Creditor code entry screen where you may either enter another PURCHASE or press <ESC> to return to the CREDITOR DATA ENTRY MENU.
Files updated by the Purchase program:
Creditor
master-file: The total of the purchase is
posted to the Creditor’s record.
Creditor
Group file: The totals posted to the
Creditor are mimicked in the Creditor Group file. This allows you to quickly
view the sales for a group without having to generate a report.
Creditor
transaction file: Each Purchase
generates a transaction. This can be viewed in CREDITOR ENQUIRIES and is used to create reports, such as CREDITOR STATEMENTS.
Orders
file: If you have created this
Purchase from an Order, the order is updated with the current purchase (units).
If you have instructed HiFinance that the Order is complete, it will be tagged
as such and can be purged by the pack program.
Purchase
image file: Every Purchase
creates a print image on disk. This is then used to print the details of the
Purchase. You can either print the image at the time you create the Purchase or
you can use the CREDITOR ENQUIRIES program
to print (or re-print) the details.
Inventory
master-file: Each Inventory line
updates the relevant Inventory record. The purchase and units on hand are
posted to this record and may be viewed in INVENTORY
ENQUIRIES. If the item is a Non-decrementing type, the units and value on
hand will remain zero. The last-purchase-price (and last foreign-currency
purchase-price, if applicable) is updated.
Inventory
Group file: The totals posted
to the Inventory item are mimicked in the Inventory Group file. This allows you
to quickly view the sales for a group without having to generate a report.
Inventory
Location file: The totals posted to
the Inventory are mimicked in the Inventory Location file. This allows you to
quickly view the sales for a Location without having to generate a report.
Inventory
transaction file: Each Inventory line
generates a transaction. This can be viewed in INVENTORY ENQUIRIES and is used to create reports.
General
Ledger master-file: This is
updated in two ways. A) if you post a line directly to General Ledger, the
value will be posted to the relevant account. B) in addition to this several
accounts are automatically posted to, eg Stock on hand and Trade Creditors.
These accounts must be defined in the GENERAL
LEDGER CONTROL ACCOUNTS. For non-decrementing stock, the account specified in
the Inventory Master-file is updated rather than the Stock on hand.
General
Ledger transaction-file: A transaction
is posted for each General Ledger transaction line and for the totals described
above.