HiFinance
5
SECTION
1.3.4.1 - DEBTOR SINGLE RECEIPTS
USAGE: To apply credits to Debtors. This function assumes
you are entering single receipts, eg single cheques, etc. The program asks for
the receipt details and then the allocation details before applying the
transaction to the Debtor.
DISCUSSION: When you start the DEBTOR
RECEIPTS program, the computer will initially ask for a Debtor code.
Insert the code and press <Enter>.
To return to the DEBTOR DATA ENTRY MENU, press <ESC>.
To search for a Debtor, press <F9>. For further details on searches, see SECTION 1.2.
Having chosen a Debtor, you may be asked which bank
you wish to post to. This question will only appear if you have enabled multi-banks.
Enter the account number of the bank you wish to post to or press <F9> to initiate a search.
BANK ACCOUNT [0000]
If are running with a single bank, all bank postings
will automatically be made to the default bank.
The screen will display the name and address and
recent balances, in full at the top of the screen. The screen will appear as
follows:
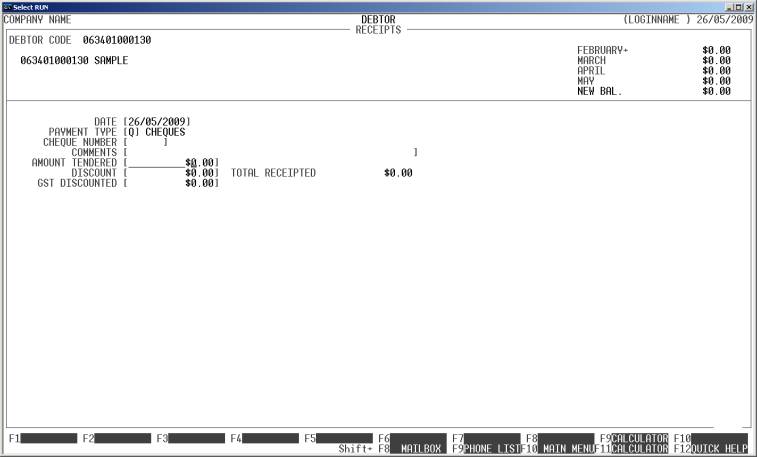
The fields available are:
DATE This is date you wish to make the receipt apply. The
date does not have to be in the current period, but if you backdate a
transaction, HiFinance will not let you choose a date in a closed period. To
close a period, use the CALENDAR
function. (See SECTION
7.1.6.). Generally, you should enter the date as per the date you are going
to deposit the monies, usually today’s date. If you press <F1>, HiFinance will insert today’s date into this
field. If you press <F2>, HiFinance will insert yesterday’s
date into this field.
PAYMENT TYPE This is a letter from A to Z. It refers to the type of payment made, eg C = Cash, Q = Cheque, etc. The payment
types are defined in BANK TRANSACTION
TYPES, (see SECTION
7.2.5). The default value for this field is determined by a field in
the SYSTEM DEFAULTS (see SECTION 7.1.2).
However, this, in turn can be overridden by the NORMALLY PAYS BY field in DEBTOR
MAINTENANCE (see SECTION 1).
REFERENCE NUMBER This can be any number from 1 to 99999999. It is a reference for your internal auditing. It
is labelled REFERENCE NUMBER for cash type transactions.
The prompt changes to CHEQUE NUMBER if you are entering a
Cheque. For entries that must have come from a reconciliation sheet, the prompt
reads STATEMENT PAGE.
COMMENTS This is an optional field. You might wish to add some details
regarding this receipt.
AMOUNT TENDERED This is the actual value of the payment received. If
the Debtor is paying the whole amount outstanding, you may press <F1> to insert the value. Note that this value must be
positive. If you press <F9>, you will initiate HiFinance’s calculator. When you press <ESC> from the calculator, the result will be inserted
into the AMOUNT
TENDERED field.
If the customer is paying the full amount, it is possible to press <F1> here and HiFinance will inset the full Debtor
Balance. This often saves time.
DISCOUNT If you have allowed the Debtor to take a discount, you may
enter the value here. This is also a convenient way of entering any small
amount the Debtor did not pay, eg 10 cents out of an Invoice for $1000. This is
simpler than separately entering a write off amount through DEBTOR ADJUSTMENTS. Like the AMOUNT TENDERED, this value must be positive.
TOTAL RECEIPTED This field is automatically inserted by HiFinance.
It is the sum of AMOUNT TENDERED and DISCOUNT.
GST DISCOUNTED If you have entered a discount, there might be a GST
component. If so, HiFinance needs to know that value so that it can post
correctly to the General Ledger. The value you enter represents the portion of
the discount that is GST, so it cannot be greater than the value of the
discount. An example might be:- an outstanding balance of $105; the Debtor pays
a cheque for $100 and you offer a discount of $5, which includes 50¢ of GST.
The entries would be 100, 5 and 0.5 for amount, discount and GST, respectively.
If you have chosen to print DEPOSIT SLIPS and you
are entering a Cheque type transaction, you will be asked the next three
fields.
BANK This is a 3 character field that allows you to
enter the initials of the bank on the cheque.
BRANCH This is a 15 character field that allows you to enter
the branch on the cheque.
DRAWER This is a 50 character field that allows you to enter
the drawer of the cheque. If you leave this field blank, HiFinance will insert
the Debtor’s name.
<ESC> To abort the whole transaction, press <ESC>. You will then be returned to the Debtor code
entry routine.
You will next be asked, RECEIPT DETAILS OK? If they
are, enter Y. If there are no outstanding debits, HiFinance will simply update
the Debtor. This is useful for entering pre-payments. If there is at least one
outstanding debit, the screen will change and ask for allocation information. A
screen will typically look as follows:
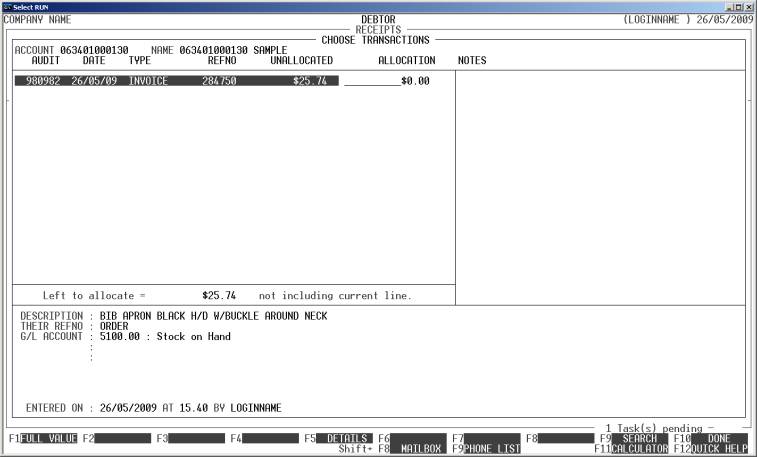
This is similar to the allocation screen in DEBTOR ALLOCATIONS (see SECTION 1.3.5.)
The main difference is that if you do not allocate the whole amount of the
Receipt, you will be required to enter a reason for the partial allocation. The
result of this is that HiFinance will force the Receipt to be completely
allocated. Any portion left over is accounted for by an adjustment transaction
that carries its own description. A legitimate reason could be OVER PAYMENT.
If you are allocating to a Debtor who has
sub-accounts, <F3> will be available for you
to mask the display to one sub-account at a time. This can be useful if there
are a lot of transactions, spanning several accounting periods and the Debtor
has made a payment that spans several sub-accounts. Instead of looking through
hundreds of transactions for the ones to allocate the payment against, you can
mask one sub-account at a time, and then allocate to a shorter list. Note that
that you cannot mask to the main Debtor itself. Once you have masked, you can
press <F3> again to mask to another
sub-account or press <F4> to clear the masking.
Although it is not necessary to clear masking before updating the allocations,
it is recommended that you do, for the purposes of checking your entries.
You should also notice that <F5> is available to display the full details of the
highlighted transaction. This functions very similarly to Transaction Enquiries
screen. This facility is included so that you can more easily identify a
specific transaction when there are several with similar values. You cannot
change the transaction itself.
If you have enabled single Creditor cheques, you
will next be asked if you wish to print a cheque. If you answer Y, a cheque will be printed. Cheques cannot be reprinted. If you are
paying a cheque to the SUNDRY Debtor, you will be asked
for the name and address. The name is compulsory. A warning will be displayed
if you leave the first line of the address blank. If you have entered a cheque
number of 999999, no cheque will be printed.
The cheque number is reserved for special entries that can be easily deleted
from the Bank Reconciliation file.
Files updated by the Debtor Receipts program:
Debtor
master-file: The Debtor’s balance will
be decreased by the TOTAL RECEIPTED.
Debtor
transaction-file: A receipt transaction
is created to match the total value of the TOTAL
RECEIPTED. It
also carries the value of any discount allowed. If the receipt has not been
fully allocated, an adjustment record is created for the balance.
General
Ledger master-file: The Trade Debtors,
Cash-at-Bank and Discounts Allowed accounts are updated. If there is a GST
component to the discount, the value is split between the Discount Allowed and
GST chargeable.
General
Ledger transaction-file: A
transaction is posted for each transaction line.
Bank
master-file: The Bank master-file is
updated to reflect the fact that there has been a change of balance and that
there is a bank deposit slip pending.
Bank
transaction-file: If you have
chosen to print Bank Deposit Slips, HiFinance will enter a transaction into
this file for later printing.