HiFinance
5
SECTION
1.3.1 - INVOICES
USAGE: To bill customers for sales of goods and services.
Invoices can be either entered here or converted from SALES ORDERS previously entered. (See SECTION 1.3.7.)
DISCUSSION: When you start the INVOICE program, the
computer will initially ask for a Debtor code. Insert the code and press <Enter>.
To return to the DEBTOR DATA ENTRY MENU, press <ESC>.
To search for a Debtor, press <F9>. For further details on searches, see SECTION 1.2.
Having chosen a Debtor, the screen will display the
name and address and recent balances, in full at the top of the screen. Also,
if you have attached a note to this Debtor, the note will appear superimposed
in the middle of the screen. You might also be warned that of a credit limit
imposed on the Debtor. Depending on your installation, other warnings may also
appear. If the Debtor has been tagged as DORMANT
or on STOP CREDIT, you will not be
able to proceed.
The screen will appear as follows:
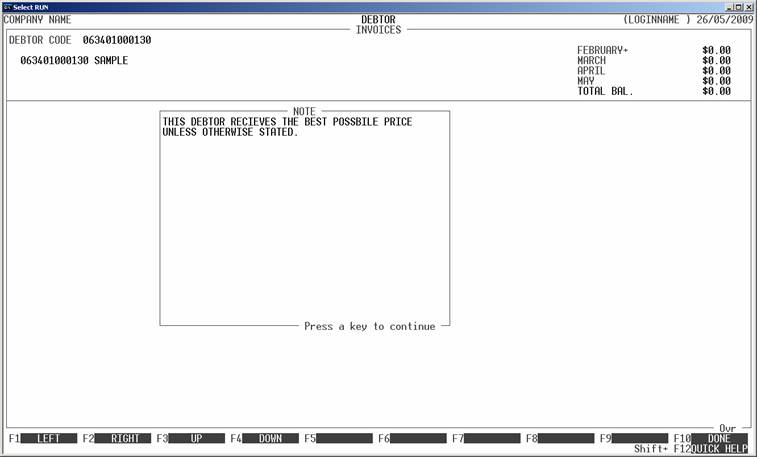
Press <Enter> to clear the note and you
will then be asked a series of questions. These relate to the ribbon
information on the INVOICE and also
control such things as tax and discounts. The exact list of fields displayed
depends on how you have chosen the options in SYSTEM DEFAULTS. (See SECTION 7.1.2.) Fields that are not displayed take their
values from the defaults set on the Debtor’s master-file.
Note that if there are any active Sales Orders for
this Debtor, you will be asked, PROCESS
SALES ORDERS?
If you answer Y, you will be presented with
a list of active Sales Orders. Choose from this list and the INVOICE will be preloaded with the
details.
The following is a complete list of possible fields:
Name Comments
DATE This defaults to the system date (the date at the
top of the screen). If you change it, HiFinance will retain the changed date
until you exit to the DEBTOR DATA ENTRY
MENU. If you have changed the date and wish to return to the system date,
press <F1>.
THEIR ORDER # This is a non-compulsory field used when your customer supplies
an order. This field is displayed on transactions and is printed on the INVOICE.
INVOICE # By default, HiFinance will add one to the last INVOICE number used and present this to
you. If you have set the option, you may then manually enter a number. As this
is your reference to the INVOICE,
you should avoid using duplicate numbers.
DEBTOR’S NAME If you are invoicing the Debtor SUNDRY,
HiFinance will ask you to enter the actual name of the Debtor. The sundry
Debtor is treated differently from other Debtors in that it can be singled out
for exclusion in certain reports. The modified name will be printed on the INVOICE and displayed in DEBTOR ENQUIRIES but will not be saved
to the Debtor master-file record.
SALESMAN # This field defaults to the Salesman as entered on the Debtor
master-file. If you have floating
salesmen, you can choose to change the Salesman’s code at this point. The
change will affect the update of commissions, but will not be written back to
the Debtor master-file.
TAX EXEMPTION CLAIM Here you choose whether the INVOICE
will be taxable or exempt. This is independent of any sale-tax number you may
have entered on the Debtor’s master-file record. To make the invoice exempt of
tax, enter Y.
TAX NUMBER If you have chosen to make the INVOICE exempt of tax, you must enter a value in this field. You
must either enter an exemption number or you may enter the word, EXEMPT. If you enter an exemption number all Inventory
lines will be extended without tax and will be added to tax rate 10. If you enter the word EXEMPT, tax rate 11 will be used. (See SECTION 7.2.7.)
Hint: To quickly enter the work EXEMPT, press <F1>. If you enter a sales-tax number here, it will be
written back to the Debtor’s master-file when the INVOICE is processed.
OVERALL DISCOUNT If you have chosen to allow overall discounts, you will be
asked to enter a value here. This can be any number from zero to 99.99%. This discount will not be applied if you manually
enter a price for an item or a Special Price is detected.
APPLY TO ALL LINES If you have enabled both line discounts and overall
discounts, and you have entered an overall discount, above, you will be asked
to resolve the potential clash. If you answer N here,
only un-discounted lines will have the overall discount applied. If you answer Y, the two discounts will be applied, geometrically.
At each point, you may cancel the invoice
by pressing <ESC>. However, it is possible to
return to a specific field by using <CsrUp> or <F8>.
After answering these fields the screen will repaint
and display as follows. Note that at this point there is no way to go back to
the above questions, except by cancelling the invoice and starting
again.
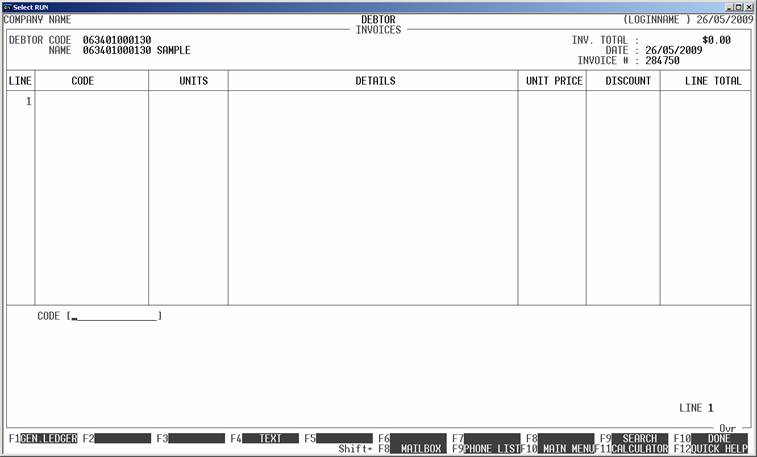
Here you may enter the complete details of each INVOICE line. You can also change from
entering an Inventory line to a General Ledger line, Job Costing line (if enabled)
or a Text line. The fields displayed depends on which type of line you are
entering and what options you have set in SYSTEM
DEFAULTS. For Inventory lines, the following fields will be asked:
CODE This is the Inventory Code. You may enter a code here
or press <F9> to initiate a search. You
can change to a different kind of entry by choosing a function key. If you
choose to enter a General Ledger line, HiFinance will remember the last code
you entered (as long as you do not exit the program). If the last line was not
zero, you can repeat the last line by pressing <F1>.
DETAILS Here you have 2 lines to enter the description of
the item. By default, HiFinance will insert the description as it appears on the
master-file. If you choose to enter a General Ledger line you can only enter
one line of description, however, HiFinance will remember the last description
you entered (as long as you do not exit the program). If the last line was not
blank, you can repeat the last line by pressing <F1>.
Also, if you have used this General Ledger account before (and have updated the
transaction) you may press <F9> to bring up the history of
details you have used before. There are up to 20 unique lines saved. Scroll
down to the one you want and press <F10> or <Enter>. The description will be automatically loaded and
you can the changed it if you wish. The new details line will be saved back to
the history file, when the transaction is updated.
UNITS You may enter any number of units, with up to 3
decimal places. Normally you should not sell more stock than you have and
HiFinance will stop you. You can downgrade this error to a warning, or suppress
it altogether by choosing the appropriate options in SYSTEM PARAMETERS. Generally, it is not recommended to cross
the zero stock level, as this can create problems in calculating cost-of-sales.
For further details, contact your dealer. If you need to calculate the number
of units, you may use <F9> to launch the calculator.
The result of the calculations will be automatically inserted into this field.
If you are invoicing the Inventory item SUNDRY, the warning is suppressed.
Note that normally
you cannot enter zero number of units. This test is not made if you are
invoicing from a Sales Order. Allowing zero units sold enables you to show
that a particular line has been back-ordered, on the Invoice. If you choose to
show back-orders, it is also necessary for you to answer N when the question IS THE ORDER
COMPLETE, is
asked, at the end of the Invoice. If you tag the Order as being complete,
HiFinance will remove it from any back-order reports, even though the line has
not been completed.
COST-OF-SALES This field can be used to manually override the
value of Cost-of-Sales. Normally, HiFinance computes the cost value of the item
being invoiced. If this field is enabled, the computed value is displayed and
it can be over-written. This option can be either suppressed or it can be used
to enter a “per-unit” value or a “total value”. The exact behaviour is
determined by the options in SYSTEM
DEFAULTS, see SECTION
7.1.2. Note that if you are invoicing the Inventory item SUNDRY, the option is forced on.
PRICE HiFinance will insert the price from the Inventory
master-file, based on the Debtor’s price code. If you need to calculate the
price, you may use <F9> to launch the calculator.
The result of the calculations will be automatically inserted into this field.
If you wish to see all the available prices, press <F1> and then choose a number or function key to insert
the price. Alternatively, you may override the price manually. If there is a
note on file for this Debtor <F4> will be available to allow
you to display this information. Similarly, <F6> will display any Billing
Address and <F7> will display any Delivery
Instructions.
DISCOUNT If you have chosen to enable line discounts, you
will be able to enter the value here, as a percentage. If the Debtor has a
default discount rate attached, HiFinance will automatically enter it here.
Note that the discount will not be entered automatically unless the field is
initially zero and you have changed the unit price or if a special price has
been detected. If you then wish to enter, or override, the line discount, you
will have to do it manually.
TAX RATE Normally, HiFinance will pick-up the tax-rate from
the Inventory master-file record. If you sell at varying rates, you can
override the rate here. If the customer is claiming a tax exemption, you may
not change the rate.
TAX BASIS Normally, HiFinance will pick-up the tax-basis from
the Inventory master-file record. If you sell at varying rates, you can
override the basis here. If the customer is claiming a tax exemption, you may
not change this field.
TOTAL HiFinance will automatically compute the line total.
If the price was zero, you will be able to enter a sale price here. This is the
total line value. If you choose to enter a value here, the discount will
be set to zero and HiFinance will automatically compute the unit price.
At each point you may press <ESC> to abort the line or the whole transaction.
If you have entered at least one line, you may press
<F5> (at the CODE field) to enter the REVIEW
function. This function allows you to view your entries, and if necessary change
or delete a line. To move between lines use <CsrUp>, <CsrDn>, <PageUp>, <PageDn>, <Home> and <End>. If there is a particularly large number of lines,
you can also use <F9> to go to a specific line number.
To modify a line, make sure it is displayed in full in the bottom window and
press <F3>. You can then re-enter any
of the details. To leave the REVIEW function, press <ESC> or <F10>, once.
To end your lines, press <F10>. You will be asked to confirm that you have
finished entering lines and then you will be asked certain trailer information.
Most of these fields may be turned off. A Complete list follows:
COMMISSION RATE This field defaults to the nominal commission rate as it
appears on the Salesman file. You may override the value for this invoice.
CARRIER You may enter a carrier’s name here. It will appear on the
invoice in the appropriate box. If you have set-up a list of Carriers, you can
use <F9> to look-up the Carrier and
load it from that table. (See SECTION 7.2.1.4.)
FREIGHT CHARGEABLE If you wish to charge freight, enter the value here. It will
automatically be posted to the Freight Chargeable account in the General Ledger
and will be separately totalled on Invoice reports.
CHANGE DELIVERY
INSTRUCTIONS HiFinance will pick-up the delivery address
saved on the Debtor’s master-file. If you wish to change it for this invoice,
answer Y.
CHANGE DELIVERY ADDRESS HiFinance will pick-up the delivery instructions
saved on the Debtor’s master-file. If you wish to change them for this invoice,
answer Y.
At the end of the INVOICE, you will be presented with a summary and you will be asked
to confirm the update. This is the point of no return. Once you answer Y,
HiFinance will update all the relevant files. Up to this point you can cancel
or modify the details. After you have updated the INVOICE, you can only remove it by entering a CREDIT NOTE.
After the invoice has updated, you can choose
to print the document and/or enter a RECEIPT.
Afterwards, you will be returned to the Debtor code entry screen where you may
either enter another INVOICE or
press <ESC> to return to the DEBTOR DATA ENTRY MENU.
Files updated by the Invoice program:
Debtor
master-file: The total of the sales and
cost-of-sales is posted to the Debtor’s record. In the case of a
Debtor/sub-account relationship, the outstanding balance is posted to the
parent account only. However the sales are posted to the actual Debtor, which
might be the parent or sub-account.
Debtor
Group file: The totals posted to the
Debtor are mimicked in the Debtor Group file. This allows you to quickly view
the sales for a group without having to generate a report.
Salesman
file: The totals posted to the Debtor
are mimicked in the Salesman file (before tax). This allows you to quickly view
the sales for a Salesman without having to generate a report.
Debtor
transaction file: Each Invoice
generates a transaction. This can be viewed in DEBTOR ENQUIRIES and is used to create reports, such as DEBTOR STATEMENTS.
Orders
file: If you have created this
Invoice from an Order, the order is updated with the current sales (units). If
you have instructed HiFinance that the Order is complete, it will be tagged as
such and can be purged by the pack program.
Invoice
image file: Every Invoice creates an
print image on disk. This is then used to print the Invoice. You can either
print the image at the time you create the Invoice or you can use the DEBTOR ENQUIRIES program to print (or
re-print) an Invoice.
Invoice
print-file: If you have chosen not to
print invoices during the update phase and you have chosen to batch invoices
(see SECTION 6.1.2)
an entry in the Invoice Batch Print file is made for each invoice. You can the
print the Invoice using the PRINT
INVOICES function (see SECTION 1.3.8.1).
Inventory
master-file: Each Inventory line
updates the relevant Inventory record. The sales and cost-of-sales is posted to
this record and may be viewed in INVENTORY
ENQUIRIES.
Inventory
Group file: The totals posted
to the Inventory item are mimicked in the Inventory Group file. This allows you
to quickly view the sales for a group without having to generate a report.
Inventory
Location file: The totals posted to
the Inventory are mimicked in the Inventory Location file. This allows you to
quickly view the sales for a Location without having to generate a report.
Inventory
transaction file: Each Inventory line
generates a transaction. This can be viewed in INVENTORY ENQUIRIES and is used to create reports.
Jobs
master-file: If you are using the
Job Costing option, you can invoice Jobs. If you do, the Job master-file will be
updated with the value of WIP you have entered. If the WIP total becomes zero,
you also have the option to tag the Job as complete.
Jobs
transaction file: Each Invoice
line that is attached to a Job generates a transaction in the Jobs
transaction-file. This can be viewed in JOBS
ENQUIRIES and is used to create reports, such as JOB TRANSACTIONS.
General
Ledger master-file: This is
updated in two ways. A) if you post a line directly to General Ledger, the
value will be posted to the relevant account. B) in addition to this several
accounts are automatically posted to, eg Sales, Cost-of-sales (as defined in
the Inventory Group), GST, Discount, Trade Debtors and Stock-on-Hand. Jobs post
to Work-in-Progress (WIP) rather than Stock-on-Hand These accounts must be
defined in the GENERAL LEDGER CONTROL
ACCOUNTS.
General
Ledger transaction-file: A transaction
is posted for each General Ledger transaction line and for the totals described
above.
Extension for United Shipping:
The
following only refers to United Shipping and the special modification for this
site.
Each product for sale must be setup as a Bill-of-Materials item. The individual components are never sold separately, but some are purchased. Other non-BOM items are invoiced normally, but there will not be many of these.
Each BOM must contain exactly 3 items. These must
contain:
a)
An item of excise. This contains the excise unit value and must be
attached to a group called EXCISE.
b)
An item of terminal charges. This contains the terminal charge for the specific
fuel and must be attached to a group called TERMINAL.
c)
Another item, not in the above groups.
For instance, ULPT might be made up of ULP, EXCISE10 and TERMINAL1. Only ULPT would be sold, and only ULP
would be purchased. These example stock codes will be used in the description,
below.
When a BOM item is invoiced, the program checks that
the 3 way setup, above, is strictly adhered to, and then will allow you to
invoice the Assembly (the product actually being sold). In the above example, ULPT. It is important that the option to update BOM
through Debtors be enabled.
Update will proceed as follows:
The
COS for ULPT will always be the same as
the sell price. This will update the stock files for ULPT.
A unit of ULP, EXCISE10 and TERMINAL1 will be sold for each unit
of ULPT. The units in the BOM record are ignored.
COS in the General Ledger will show the full for
wherever ULP is pointing and the partial values for wherever EXCISE10 and TERMINAL1 are pointing. (Note that
the Sales pointer in the EXCISE and TERMINAL Inventory groups, are ignored.)
SALES goes to the Sales pointer in the ULPT’s Inventory group, as per normal, and all other
values update the General Ledger in the normal way (eg Trade Debtors, etc.).
The purpose of this modification is to allow one
line to appear on the invoice, but the components to be split in the General
Ledger. It also means that stock can be sold before it is purchased. Any
discrepancy in ULP’s sales value (in Inventory)
will have to be taken up in a stock losses account. Similarly, dips of the
storage of ULP are adjusted to a stock
losses account in the General Ledger.
Extension
for Foreign Currency
If your
installation has the Simple Debtor for Foreign Currency option enabled, you
will be asked (during printing) if you would like to print in a Foreign
Currency. For this option to work, the invoice must not have GST and it must
only have one line and it must be a General Ledger line. When printing, you
will be asked for the Foreign Currency unit (which must be the Foreign Currency
Table) and the Foreign Currency total. The rate will be computed backwards and
saved in the Foreign Currency Table. Enquiries will display the Foreign
Currency value, if it exists. Note that reprinting will allow you to override
and change the V fields (including cancelling it out altogether). The Debtor
will still have the value in $A.