HiFinance
4
SECTION 7.2.1.7.2 -
SET/RESET AUTO EXTRAS WITHIN DEBTOR RANGE
USAGE: To tag (or reset) all or a range of Debtors so
that they will trigger printing of AUTO EXTRA SALES ORDER LINES.
DISCUSSION: When you start this function HiFinance will check
that all the Inventory lines on the table actually exist. If not, an error to
that effect will be displayed and you will not be able to proceed. To clear the
error, use SETUP AUTO EXTRA SALES ORDER
LINES (see SECTION 7.2.1.7.1).
The first question that appears
is:
DEACTIVATE ALL EXTRAS? (Y+/N-) [N]
If you enter Y here, HiFinance will go directly to the
ranges screen (as described below). If you choose to proceed, the program will
scan all Debtors in the chosen range and set all flags to N. If you have just enabled this function,
clearing all flags for all Debtors is a good procedure to follow because it
makes sure that any spurious data is reset.
If you enter N to the first question, your will be
presented the following screen:
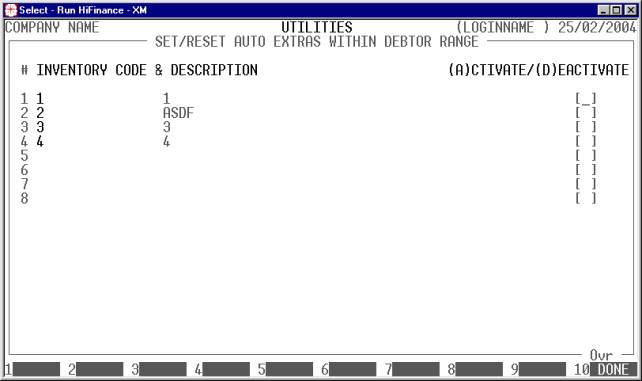
The actual inventory codes presented will depend on
your choices in SETUP AUTO EXTRA SALES
ORDER LINES (see SECTION 7.2.1.7.1).
Here you can enter an A or D
against any of the lines that have an Inventory code attached. (+ can substitute an A and -
can substitute a D.) You can also
leave any line blank. If you enter an A,
you are requesting that this line be activated for each Debtor in the range you
choose (below). A D will deactivate
the chosen line. If you leave the field blank, HiFinance will not change that
line for any Debtor. In this way you can control what you turn on and off and
what you leave alone.
You must enter an A or D
on at least one line.
Next you will be presented
a screen offering you a series of ranges. The following questions will appear:
INCLUDE ACTIVE DEBTORS Active Debtors are defined as those that have a balance.
INCLUDE NON-ACTIVE
DEBTORS Non-active Debtors are defined as not
having a balance. If you wish to print sub-accounts, you must answer Y here.
INCLUDE BILL-TO DEBTORS
ONLY If you do not use the sub-account facility,
this question is irrelevant. If you have sub-accounts and wish to only print
the main accounts, enter Y. To show the sales
breakdown of each sub-account, enter N.
The following question asks you to enter both a
lower and upper limit. The upper limit must not be less than the lower limit.
The default answers define the extreme limits of the field. You do not have to
change all of these limits. Only change the ones you wish to, and tab past the
others.
CODE RANGE This is the Debtor’s code.
GROUP RANGE This is the Debtor Group.
NAME RANGE This is the first 10 characters of the Debtor’s name.
POSTCODE RANGE This is the postcode. For this to work, you must use the postcode
field on the Debtor’s master-file.
OTHER KEY RANGE This may appear as a different literal depending on how
you have defined the field in SYSTEM
PARAMETERS.
SALESMAN RANGE This is the salesman code as it appears on the Debtor master-file
(not the transaction file).
YTD SALES RANGE This is the total sales for this year and next year,
irrespective of the period you are running the report for.
TOTAL BALANCE RANGE This is the total balance, irrespective of the period you are
running the report for.
To start the report, press <Enter> through each field or simply press <F10>.
Once HiFinance has accepted your choices, you will
be asked to confirm and then the program will scan the Debtor master-file,
changing the flags as per your choices. When complete, you will be return to
the EXTRA ORDER LINES MENU.