HiFinance
4
SECTION
7.1.3.1 - ASSIGN LOCAL PRINTERS
USAGE: To assign each reporting facility to a printer
driver and port. These changes are local to each terminal and must be set-up
separately for each new terminal added to the system.
DISCUSSION: Initially HiFinance assigns each report to PRN if you are using DOS, or prin1 if you are using UNIX.
Also, each printer type is assumed to be type 3 or Epson FX-80 compatible, which is the most widely
available printer type in Australia.
The screen initially appears as follows:
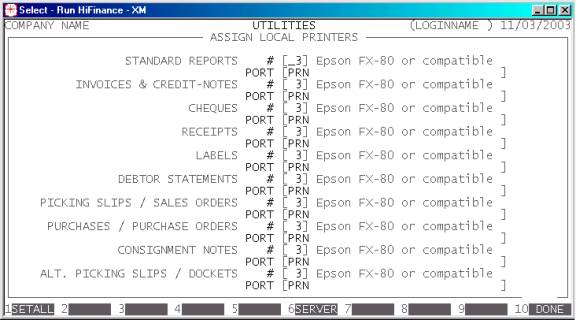
The screen displayed above shows the list of printers
currently defined for your terminal. Various releases of HiFinance may have
some of the unused printers (8-9) defined.
Hint: If you wish to use the wide report formats with
wide printers, choose the narrow equivalent (eg. FX-80). This will allow HiFinance
to use condensed print when necessary. If you intend to only use the narrow
format reports but are using wide paper (15”), choose the wide equivalent (eg.
FX-100) to suppress condensed print. Normally, printer setup is already done by
your dealer at setup time and should be correct.
The columns have the following meanings:
PRINTER This is the report function. There are 10 report
groups:
STANDARD REPORTS This includes most reports, eg. DEBTOR ANAYSIS, General Ledger Chart of Accounts,
etc.
INVOICES &
CREDIT-NOTES This specifically refers to printing of INVOICES and CREDIT-NOTES irrespective of whether they are printed from the invoice
program or reprinted from DEBTOR
ENQUIRIES.
CHEQUES This refers to all cheques
printed by HiFinance irrespective of whether they come from the Creditor or
General Ledger sub-systems.
RECEIPTS This refers to all receipts printed by
the system irrespective of whether they come from the DEBTOR, Creditor or General Ledger sub-systems.
LABELS This refers to Debtor and Creditor labels. It does
not necessarily refer to packing labels, consignment notes, etc. These are
specifically set-up for your site.
DEBTOR STATEMENTS This refers to statements printed from the DEBTOR sub-system.
PICKING SLIPS / SALES
ORDERS This specifically refers to printing of DEBTOR SALES ORDERS irrespective of
whether they are printed from the Sales Order program or reprinted
from DEBTOR ENQUIRIES. Sales Orders
can be marked as Proforma Invoices or Picking Slips, depending on your
Company’s options. These options print via the same routines as Sales
Orders and thus use the same option, here.
PURCHASES / PURCHASE
ORDERS This specifically refers to printing of CREDITOR PURCHASE
ORDERS irrespective of whether they are printed from the PURCHASE
Order program or reprinted from CREDITOR
ENQUIRIES. Some sites have specific forms that print from purchases.
These will also print to the printer chosen here.
CONSIGNMENT NOTES This specifies the printer used when printing Consignment
Notes, which are printed along with Invoices in certain
installations. If you do not use this option, the value can be set to any valid
number, eg the same as for Standard Reports.
ALT. PICKING SLIPS /
DOCKETS This specifies the printer used when printing
Invoices
for the Sundry Debtor. This must also be
enabled in SYSTEM DEFAULTS. This
option is also used when you enable the Print Picking Slips option. This option
allows you to choose to print a Sales Order as an order or a picking slip. You
can used this option to print the different layouts to different printers. If
you do not use this option, the value can be set to any valid number, eg the
same as for Standard Reports.
# This is a number from 1 to 99. It refers to a printer
driver. The printer drivers themselves are defined in SECTION 7.1.5 - CONFIGURE PRINTERS. The value
entered here must not be zero and the description of the printer entered must
not be spaces or HiFinance will assume that the printer is not defined.
DESCRIPTION This is the description of the printer entered
above. This is inserted automatically from the table of printer drivers. Note
that the description is not updated until you press <F10> to update.
PORT Here you enter the port you wish to connect the
printer to. Eg. in DOS the default parallel port is PRN or LPT1. If, however, you have a
printer connected to the second serial port, enter COM2 here. Note that in DOS 5 or above, you should not
enter a colon (:) after the name or DOS will assume a file rather than a port.
In UNIX you can
create printer names up to 30 characters long, but these also need to be
defined using mkdev lp. By default, HiFinance will
assign all the printer names to printer1. HiFinance will send the
report to that printer via lp. If you enter an invalid
name here, the results will be indeterminate. Care should be taken to enter the
correct case (usually lower-case) in UNIX based systems. DOS based systems are
case insensitive.
If you are running a
Windows 9x network, the printer names can be prefixed with the terminal name.
This is preferable to using the capture command, as it is much faster, but you
must make sure that the printer names are correct, otherwise any attempt to
print will cause the program will terminate with a I/O error. If you use this
option the printer names will be in the format \\Remote\Printer, where Remote is the name of the remote
computer and Printer is the share name of that
printer. Note the usage of the double back-slash. Note also that you have 30
characters to describe the name so it is not recommended that you choose
printer names that are very long. If you have problems with the system crashing
when you print this way, check that the printer name and print-server name do
not contain any special characters, eg spaces, full-stops, etc. Particularly
check for spaces. Windows 9x will allow you to put spaces in but is
inconsistent as to how it handles them. If you have a name such as print spooler or Epson fx-80, replace the spaces with underscores ie, print_spooler or Epson_fx-80. Or better still, get rid
of the spaces altogether. Also, printing is faster if you activate the option
to “Print directly to printer” in the Spool Settings option of any shared
printers.
For Windows NT4 or above,
(including Win200x, WinXP, etc.) you cannot write across the network in the way
described for Win9x, above. In this case you must use either the capture
command, or better still, insert a command (from DOS or a batch file) that
includes the string net use lpt1
\\print_server\invoice /Persistent:yes . where print_server should be replaced by what
ever the name of your server is, and invoice should be replaced by what ever
the share name of the printer is, as seen by the server. Note that using this
method, most NT based systems will not allow more than LPT1, LPT2 and LPT3. Unlike Win9x, LPT4 and LPT5 are not reliably available. If this is not enough
but you can normally use COM1 and COM2 as well. Note that, by default, WinNT
will defaults the printer time-out to 15 seconds. This is often far too slow
and so the windows registry item pertaining to this must be modified. Normally
it should be set to 2 seconds. For further information, please refer to http://support.microsoft.com/default.aspx?id=kb;en-us;Q101850
for Microsoft’s description of the modification required, or to a better
description at http://www.resortdata.com/Customers/Knowledge/KB-DOS/K000036.htm.
The main details of the 2nd link are inserted here:
Every computer using any
version of Windows 2000 or Windows XP will need the changes described
below. This includes the Windows 2000 data server.
To decrease the time out use
the steps below to edit the registry setting:
HKEY_LOCAL_MACHINE\SYSTEM\CurrentControlSet\Control\WOW\LPT_Timeout
WARNING: Using REGEDT32 can
cause serious damage to your operating system. Make sure to follow these steps
exactly or call your dealer to do the changes for you.
On the Windows 2000 or
Windows XP machine where the printer is connected, click Start -> Run and type REGEDT32
Bring up HKEY_LOCAL_MACHINE on Local
Machine
In the header, click View and
make sure to check Tree and data
In the left hand pane,
expand System ->
CurrentControlSet -> Control -> WOW
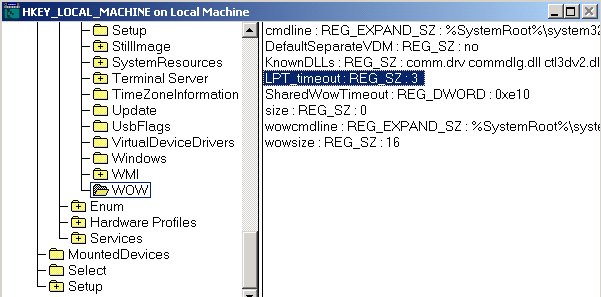
In the right pane should be
a key LPT_timeout. Double click this key
A prompt for a string with a
default of 15 (seconds) will appear.
Change this to 2 and click OK. The screen
should appear as below.
Close RegEDT32
Repeat these steps for every
computer running any version of Windows 2000 or Windows XP, including the file
server.
Further
to the above there are several function keys to choose from:
<F1> Sometimes you might wish to setup all of your
printers to point to the same device. When you press <F1> a box appears allowing you to enter the printer
number and port. When you press <Enter> or <F10> to complete this box, all the printers will be set
to this entry. To actually update the control file, you must still press <F10>, as below.
<F6> This allows you to setup links to your server
printers. This option is only relevant if you are using the PRINT SERVER
software option. See below for details.
<F10> Press this key when you wish to save the changes you
have made. You will be required to confirm your selection.
<ESC> This will return you to the USER DEFAULTS MENU without
further updating your control files.
Note: Changes you make here
update your terminal immediately. There is no need to log-off and re-log-on.
The changes are purely local and do not affect any other terminals because each
terminal logs into its own directory and/or drive creating its own local
control file (FHIF01.DAT).
PRINT SERVER OPTION
This option is only relevant if you are using the PRINT
SERVER option. This option allows you to print faxes and emails. It
requires a specially installed driver. Here you define where you wish to the
output to go if you choose to print. When you choose the option, you are asked
to press either <F5> for Debtor related print
functions, or <F7> for Creditor related print
functions. One of the following screens is displayed:
The options refer to the initial printing and
reprinting of various forms. The paths entered here are the printer names to be
used when you print in email format (i.e. type Z) to
paper. If you wish to print to standard forms, when printing to paper
(irrespective of your choice to use faxes or emails) you do not have to enter
anything here. Note that the printer names entered here are not the devices (eg
PRN) but they are the Windows share names (eg HP LaserJet1). The names have to correspond to what Windows
expects when viewed from the computer running the server software.
Both screens have an <F1> function,
which allows you to quickly set all the printers to the same value.
To complete this screen, either press <F10> or <Enter> past the last field. If you
press <ESC> at any time, your entires
will be ignored.