HiFinance
4
SECTION
1.3.9.1 – PICKUP & DELIVER
USAGE: This is a special program that allows a single
pickup and delivery for non-blended fuels. No provision is made for freight.
The assumption is that this program will be used for own-trucks delivering
simple pickups and deliveries. For transactions outside of this restriction,
use the DELIVERIES program, which is more complex, but more comprehensive.
(See SECTION 1.3.9.3). This program can also convert
SALES ORDERS previously entered.
(See SECTION 1.3.7.)
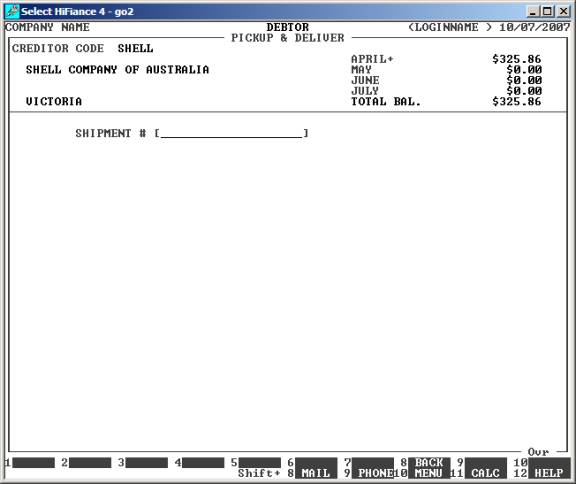
DISCUSSION: When you start the PICKUP & DELIVER
program, the computer will initially ask for a Creditor code. This is the code
of the supplier of the fuels. Insert the code and press <Enter>.
To return to the DEBTOR DATA ENTRY MENU, press <ESC>.
To search for a Creditor, press <F9>. For further details on searches, see SECTION 1.2.
Having chosen a Creditor, the screen will display
the name and address and recent balances, in full at the top of the screen.
The screen will appear as follows:
Having selected a Creditor, you will be asked to
enter several fields relating to the purchase that will be created.
The following is a complete list of possible fields:
Name Comments
SHIPMENT # Here you enter the Shipment number of the pickup.
This is the number quoted by the truck driver when picking up the fuel load.
OUR
ORDER # This is a non-compulsory field used if
you have quoted an order number for the pickup. This field is documentary.
This ends the information required to define the Purchase
ribbon information. Next you are asked for he details of the Debtor (customer).
Initially you are asked to enter a Debtor code. If you have made a mistake, you
may press <F8> to return to the previous
portions of the program, or <ESC> to abort the procedure and
start again. The screen appears as follows:
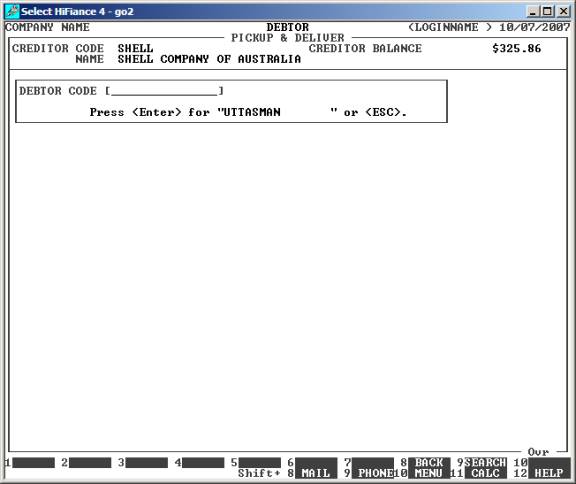
Enter the Debtor’s code and press <Enter>. If you do not remember the code, press <F9> to initiate a search.
When you choose a Debtor, HiFinance will display a
note, if there is one attached to the Debtor. Also, if the Debtor is on
Stop-Credit, etc., a message will be displayed, and you may be required to override
this with a password.
Having passed the above tests, you will then be
asked a series of questions. These relate to the ribbon information on the INVOICE and also control such things as
tax and discounts. The exact list of fields displayed depends on how you have
chosen the options in SYSTEM DEFAULTS.
(See SECTION 7.1.2.)
Fields that are not displayed take their values from the defaults set on the
Debtor’s master-file.
Note that if there are any active Sales Orders for
this Debtor, you will be asked, PROCESS
SALES ORDERS?
If you answer Y, you will be presented with
a list of active Sales Orders. Choose from this list and the INVOICE will be preloaded with the
details.
The following is a complete list of possible fields:
Name Comments
THEIR ORDER # This is a non-compulsory field used when your customer supplies
an order. This field is displayed on transactions and is printed on the INVOICE.
INVOICE # By default, HiFinance will add one to the last INVOICE number used and present this to
you. If you have set the option, you may then manually enter a number. As this
is your reference to the INVOICE,
you should avoid using duplicate numbers.
SALESMAN # This field defaults to the Salesman as entered on the Debtor
master-file. If you have floating
salesmen, you can choose to change the Salesman’s code at this point. The
change will affect the update of commissions, but will not be written back to the
Debtor master-file.
DEBTOR’S NAME If you are invoicing the Debtor SUNDRY,
HiFinance will ask you to enter the actual name of the Debtor. The sundry
Debtor is treated differently from other Debtors in that it can be singled out for
exclusion in certain reports. The modified name will be printed on the INVOICE and displayed in DEBTOR ENQUIRIES but will not be saved
to the Debtor master-file record.
At each point, you may cancel the invoice
by pressing <ESC>. However, it is possible to
return to a specific field by using <CsrUp> or <F8>.
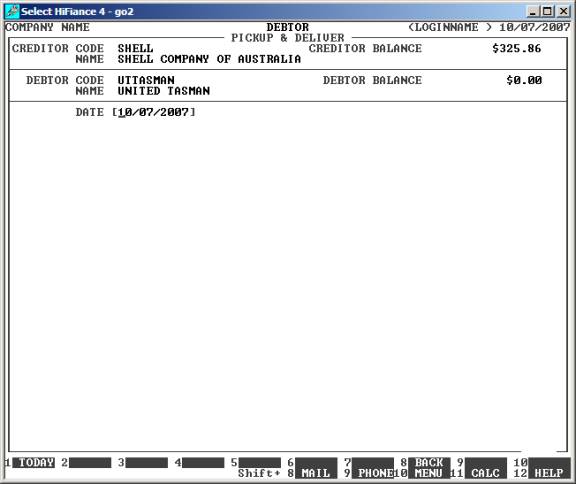
The screen then rules off and asks you for the date.
This defaults to the system date (the date at the top of the screen). If you
change it, HiFinance will retain the changed date until you exit to the DEBTOR DATA ENTRY MENU. If you have
changed the date and wish to return to the system date, press <F1>. The screen appears as follows:
After entering a date, the screen again rules off
and you are presented with a table of 4 lines. These represent the (up to) 4
Inventory lines you can now enter. There are fields that must be entered for
each line to be accepted. The screen appears as follows:
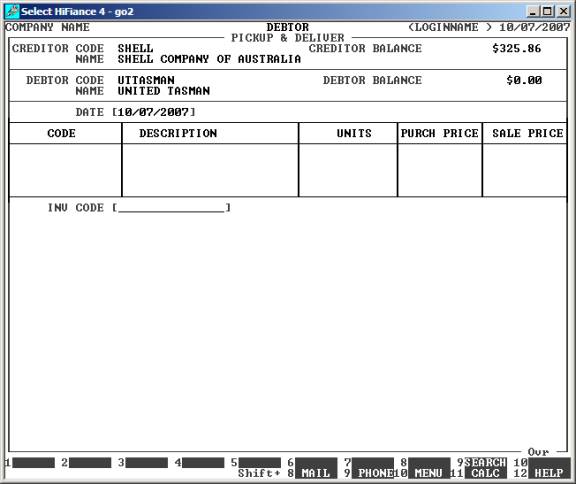
The following is a complete list of possible fields:
Name Comments
INV CODE This must be a valid Inventory code. You can search for the code by pressing <F9>.
You must enter at least one line. After that, <F10>
is available for ending the entries. An Inventory code is only allowed once per
transaction. Once at least one line has been entered, you may also press <F5> to modify or delete a line.
DETAILS By default, HiFinance will enter the description of the Inventory
line from the Inventory master-file. You may over-write it, if you need to add
more information.
UNITS Here you enter the number of units sold/purchased.
This field must not be zero.
PURCH PRICE Here you enter the unit cost (ex-GST) of the Inventory being
purchased.
SALE PRICE Here you enter the unit price (ex-GST) of the Inventory being sold.
When you have entered all the lines (max 4), press <F10> to continue. You are asked to confirm and a summary is displayed:
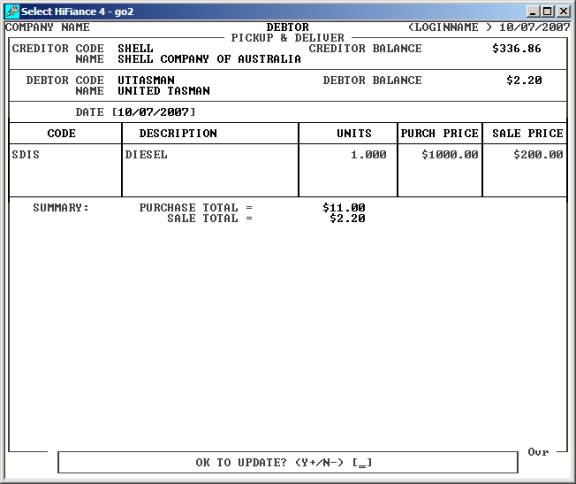
If you answer Y, the update will proceed. Otherwise
you will be returned to the Inventory code entry area.
When the updates have completed, Invoices will be
printed (depending on the options you have chosen, you may be asked to print).
At the end of this you will be returned to the Creditor code entry screen,
where you can either enter another transaction, or press <ESC> to return to the menu programs.
Files updated by the Pickup & Deliver program:
Debtor
master-file: The total of the sales and
cost-of-sales is posted to the Debtor’s record. In the case of a
Debtor/sub-account relationship, the outstanding balance is posted to the
parent account only. However the sales are posted to the actual Debtor, which
might be the parent or sub-account.
Debtor
Group file: The totals posted to the
Debtor are mimicked in the Debtor Group file. This allows you to quickly view
the sales for a group without having to generate a report.
Salesman
file: The totals posted to the Debtor
are mimicked in the Salesman file (before tax). This allows you to quickly view
the sales for a Salesman without having to generate a report.
Debtor
transaction file: Each Invoice
generates a transaction. This can be viewed in DEBTOR ENQUIRIES and is used to create reports, such as DEBTOR STATEMENTS.
Sales
Orders file: If you have created this
Invoice from a Sales Order, the order is updated with the current sales
(units). If you have instructed HiFinance that the Order is complete, it will
be tagged as such and can be purged by the pack program.
Invoice
image file: Every Invoice creates a
print image on disk. This is then used to print the Invoice. You can either print
the image at the time you create the Invoice or you can use the DEBTOR ENQUIRIES program to print (or
re-print) an Invoice.
Invoice
print-file: If you have chosen not to
print invoices during the update phase and you have chosen to batch invoices (see
SECTION 6.1.2)
an entry in the Invoice Batch Print file is made for each invoice. You can the
print the Invoice using the PRINT
INVOICES function (see SECTION 1.3.8.1).
Creditor
master-file: The total of the purchase is
posted to the Creditor’s record.
Creditor
Group file: The totals posted to the Creditor
are mimicked in the Creditor Group file. This allows you to quickly view the
sales for a group without having to generate a report.
Creditor
transaction file: Each Purchase
generates a transaction. This can be viewed in CREDITOR ENQUIRIES and is used to create reports, such as CREDITOR STATEMENTS.
Inventory
master-file: Each Inventory line updates
the relevant Inventory record. The sales and cost-of-sales is posted to this
record and may be viewed in INVENTORY
ENQUIRIES. This is true for both the Purchase and Sales parts of the
transactions.
Inventory
Group file: The totals posted to the
Inventory item are mimicked in the Inventory Group file. This allows you to
quickly view the sales for a group without having to generate a report.
Inventory
Location file: The totals posted
to the Inventory are mimicked in the Inventory Location file. This allows you
to quickly view the sales for a Location without having to generate a report.
Inventory
transaction file: Each Inventory line
generates a transaction. This can be viewed in INVENTORY ENQUIRIES and is used to create reports.
General
Ledger master-file: Several accounts are
automatically posted to, eg Sales, Cost-of-sales (as defined in the Inventory
Group), GST, Discount, Trade Debtors, Trade Creditors and Stock-on-Hand. These
accounts must be defined in the GENERAL
LEDGER CONTROL ACCOUNTS.
General
Ledger transaction-file: A
transaction is posted for each General Ledger transaction line and for the
totals described above.