Total
Legal Accounting 3
SECTION 1.2 - CLIENT/TRUST ENQUIRIES
USAGE: To enquire on the Client/Trust balances and static
information such as the name, balances and notes. To enquire on the
transactions pertaining to an individual Client. In both cases, information can
be displayed on the screen or printed. Information cannot be changed by this
option.
DISCUSSION: When you start the enquiry program, the computer
will initially ask for a Client code. Enter the code and press <Enter>.
To search for an account, press <F9>.
The following pages describe in full the
procedure for searching for Debtors. The procedure is similar for other files.
If you do not need this detail, skip past the next few pages.
Searching for
a Client:
When you are asked for a Client code, you have
several options. Initially, T.L.A. will display a blank field:
If you have chosen to answer Y to the question CARRY LAST KEY
FROM ONE FUNCTION TO NEXT, in SYSTEM DEFAULTS (see SECTION 6.1.2),
the prompt may inform you that if you press <Enter>, T.L.A. will automatically recall
the last Client you accessed. In either case, if you press <F9>, you will be taken to the search screen. If you
enter a blank code and you have answered Y to the question AUTO-SEARCH WHEN KEY DOES NOT MATCH, this will have the same
effect as pressing <F9>.
The screen will appear as follows:
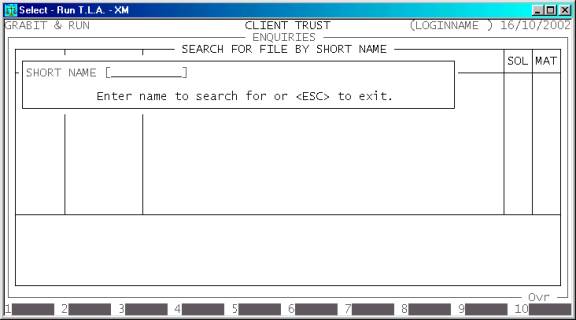
This screen allows you to enter a SHORT NAME to initiate the search. When you first enter T.L.A.
the field will be blank. If you have the CARRY
KEYS option
set, T.L.A. will pre-load the field with the last Client you accessed. Press <Enter> or enter a name to search on and then press <Enter>. T.L.A. will the search through the Client Master
File and display a group of Client Files starting with the code you entered.
Note that the list will be in SHORT NAME order.
Having chosen an initial code, the screen will
appear as follows:
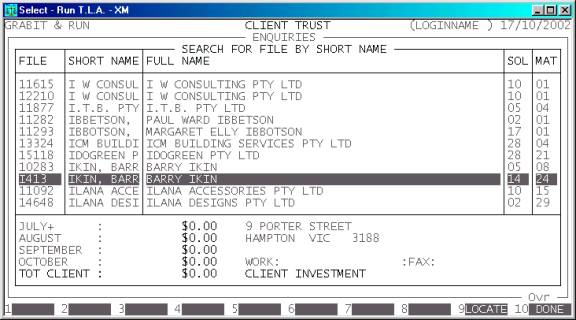
The search will start at either the beginning of the
Client file or from any partial code you have entered in the previous screen.
You will notice that one line has a horizontal line
across it. This is known as the current
line. The current line is the one that is displayed in detail at the bottom
of the screen.
There
are several function keys available in this screen:
<Enter> This will return the File on the current line to the calling
program. In CLIENT/TRUST ENQUIRIES,
this File will then be displayed in full.
<F9> The purpose of this key is to open up a window that
allows you to enter a new SORT NAME for the program to start
the search from. Enter the new starting point and press <Enter>.
<F10> This has the same function as <Enter>, above.
<ESC> This will abort the search and return you to the
Client code entry screen.
<CsrUp> This will move the current line up by one. If you are already
on the first entry, the computer will beep and the highlight bar will not move.
<CsrDn> This will move the current line down by one. If you are
already on the last entry, the computer will beep and the highlight bar will
not move.
<PgUp> This will cause the search screen to attempt to move one
page up. If you are already at the top of the file, the highlight bar will not
move. If you are at the bottom of the screen, the highlight bar will move to
the top. If you are anywhere else, the screen will display one page of Client
records backwards, without moving the highlight bar (unless you have reached
the start of the Client master-file).
<PgDn> This will cause the search screen to attempt to move one
page down. If you are already at the end of the file, the highlight bar will
not move. If you are at the top of the screen, the highlight bar will move to
the bottom. If you are anywhere else, the screen will display one page of
Client records forwards, without moving the highlight bar (unless you have reached
the end of the Client master-file).
<Home> This will move the highlight bar to the top of the
screen and make the first Client the current line.
<End> This will move the highlight bar to the bottom of the
screen (if there are enough entries to fill the screen) and make the last
Client the current line.
<A-Z> If you enter a letter (in upper or lower case), the
search will move directly to the first Client that starts with that letter.
<The Mouse> In search screens, T.L.A. allows you to use the mouse to move around
the screen. If you click on the current line, this will have the same effect as
<F10>. Clicking on any other
record will move the highlight bar to that line. Therefore double clicking on a
line will choose that line and return it to the ENQUIRY program. If you click outside the main window, the effect
will be the same as <CsrUp> or <CsrDn> depending on whether you click above or below the
window.
Displaying
Client/Trust Information.
Having entered a valid code, the computer will
display the current information pertaining to that Client/Trust file. The
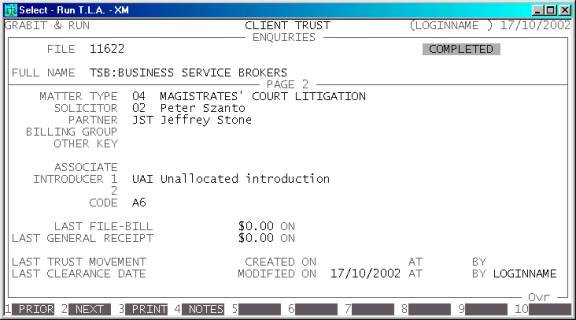
information is on several pages. The first page appears as follows:
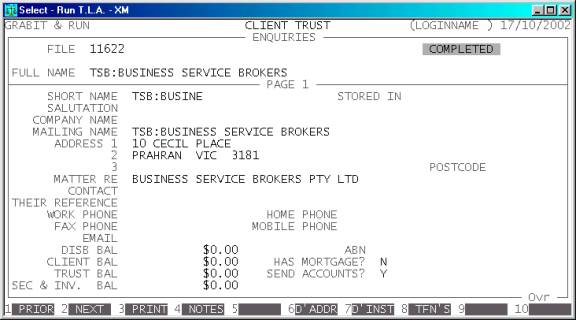
The top of the screen displays the Client’s code and
full name. This first page displays the basic file information including the
main balances, phone numbers, addresses, etc.
You will have several options available via the
function keys:
<F1> or <CsrLeft> This
will cause T.L.A. attempt to read the previous record. If there is one, it will
be displayed.
<F2> or <CsrRight> This
will cause T.L.A. attempt to read the next record. If there is one, it will be
displayed.
<F3> will print the information currently on the screen.
Before printing the computer will ask, START
REPORT? To
start the report, answer Y. If you do not wish to
print, answer N. More information is
printed on this report than appears on the screen.
<F4> This overlays a window that displays the note
attached to this File. If there is no note, the function key is not active. If
however, your USERCODE has rights to enter notes during ENQUIRES,
the option will always be available.
<F6> This overlays a window that displays the Delivery
Address attached to this File. If there is no Delivery Address, the function
key is not active.
<F7> This overlays a window that displays the Delivery
Instructions attached to this File. If there is no Delivery Instructions, the
function key is not active.
<F8> This option will only be available is a) there are
TFN’s attached to the current file and b) your USERCODE has rights to
view TFN’s.
<ESC> will return to Client code entry routine. From
there, another <ESC> will exit the program and
return you to the CLIENT/TRUST enquiry MENU.
<PgDn> will move you to the next screen. This screen
displays more detailed information on certain aspects of the file. This data is
not needed are often.
The
screen will display as follows:
You will have several options available via the
function keys:
<F1> or <CsrLeft> This
will cause T.L.A. attempt to read the previous record. If there is one, it will
be displayed.
<F2> or <CsrRight> This
will cause T.L.A. attempt to read the next record. If there is one, it will be
displayed.
<F4> This overlays a window that displays the note attached
to this File. If there is no note, the function key is not active. If however,
your USERCODE has rights to enter notes during ENQUIRES, the
option will always be available.
<ESC> or <PgUp> will return you to the
previous screen.
<PgDn> will move you to the next screen. This screen
specifically deals with client balances and gives you access to transaction
details.
The
screen will display as follows:
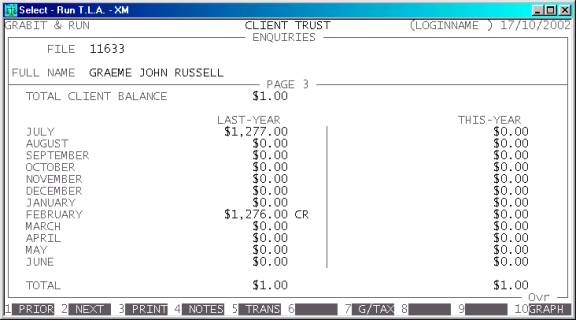
This screen displays the client balance for each
accounting period in this year and last year. There is a total for each column
at its base.
You will have several options available via the
function keys:
<F1> or <CsrLeft> This
will cause T.L.A. attempt to read the previous record. If there is one, it will
be displayed.
<F2> or <CsrRight> This
will cause T.L.A. attempt to read the next record. If there is one, it will be
displayed.
<F3> will print the information currently on the screen.
Before printing the computer will ask, START
REPORT? To
start the report, answer Y. If you do not wish to print,
answer N. More information is
printed on this report than appears on the screen.
<F4> This overlays a window that displays the note
attached to this Debtor. If there is no note, the function key is not active.
<F5> will allow you to display transactions for this
account. The transaction screen is discussed below.
<F7> This option will only be live if there are
transactions on file. When you choose this option, T.L.A. will quickly read
through the transactions for this file and compute the current Government Taxes
payable. For further information on Government Taxes, see SECTION
7.2.1.7.
<F10> This will option will send the information on the
screen to a special program that formats it into a vertical bar graph. The graph
shows all periods, separating the years with colours. In the standard colour
scheme, last-year is in yellow, this-year is in red and next year (if not zero)
is in green. In either case, the legend is displayed near the top-right-hand
corner of the screen. The vertical axis is self-scaling.
<ESC> will return you to the previous screen.
Starting Client/Trust
Transaction display.
If there are any transactions available for this
File, <F5> will be displayed. When you
press <F5> the screen will appear as
follows:
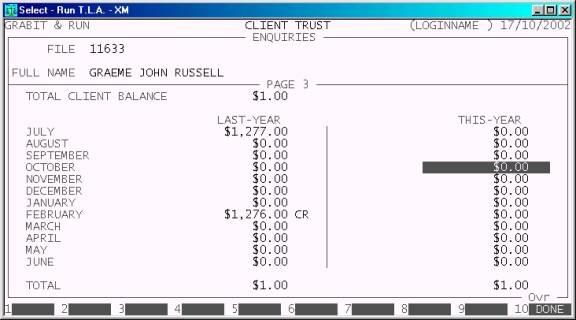
The balance corresponding to the current month is
highlighted. When you press <Enter> or <F10>, T.L.A. will move to the Transaction Display
program. This program will attempt start to display transactions from the
highlighted period. If you wish to display transactions for another period, use
the cursor keys to move the highlight to that period, and then press <Enter> or <F10>. If you are using the
mouse, clicking on a period will immediately start the transaction display from
that period.
Displaying Client/Trust
Transactions.
Having chosen a period, the display program will
start up. The screen will appear as follows:

The initial screen will display all transaction
types with their values in one of three columns, representing Disbursements,
Client and Trust.
Moving around this screen is similar to searching
for a Client. This is fully described above. You will also have several options
available via the function keys:
<F1> If you have chosen to mask the transactions to a
certain class (see below), pressing <F1> will revert the screen to
the default (showing all transaction types).
<F2> This option is not available for all transaction
types and has different values depending on the transaction type. For instance,
for receipts, T.L.A. offers you the option to reprint a receipt, for dissected
File-bills, T.L.A offers to display the dissections.
<F3> This will cause T.L.A. to initiate a print of the
transactions for this File. If you have chosen to mask the display to a class of
transactions (see below), printing will also be masked. When you start the
printing process, you are then asked if you wish to limit the report to a range
of transaction dates
<F4> This option will only appear if there are
disbursement transactions on file for this Client. If you choose this option,
the display will change, only displaying any disbursement transactions and any
associated transactions in that class. Also the monetary screens will change,
displaying debits, credits and a running balance.
<F5> This option will only appear if there are client
transactions on file for this Client. If you choose this option, the display
will change, only displaying any client transactions and any associated
transactions in that class (eg File-Bills, Client Receipts, etc.) Also the
monetary screens will change, displaying debits, credits and a running balance.
<F6> This option will only appear if there are unallocated
client transactions on file for this Client. This option will exclude any paid
items. Otherwise it is similar to <F5>. If you choose this option,
the display will change, only displaying any client transactions and any
associated transactions in that class (eg File-Bills, Client Receipts, etc.)
Also the monetary screens will change, displaying debits, credits and a running
balance.
<F7> This option will only appear if there are trust
transactions on file for this Client. If you choose this option, the display
will change, only displaying any trust transactions and any associated
transactions in that class (eg Transfers, Cheques, etc.) Also the monetary
screens will change, displaying debits, credits and a running balance.
<F8> This initiates a search through the transaction
files for all transactions that have the same transaction audit number as the
current record. This is similar to the SEARCH
FOR AUDIT NO function except that you are not prompted for an audit number
because T.L.A. already knows which
number to search on. See SECTION 6.5.5.
<F9> This allows you to start the display from a
different period. A window is opened that asks for the year and period.
<F10> or <Enter> This will
option is used to display the allocations for the highlighted transaction. The
option is not available if the transaction is fill unallocated. The information
is displayed in a box at the bottom of the screen. If you highlight an
allocation line, you can further use <F8> to de-allocate it. This
undoes the allocation and returns the balances to what they were. This is
useful if, for instance, you have accidentally allocated a receipt to the wrong
invoice.
<ESC> This will return you to the calling program.