HiFinance
5
SECTION 7.2.1.5I.6 - WHITECARDS TRANSLATION TABLE ASCII EXPORT
USAGE: To export a file detailing
all or a subset of the information on the Whitecard Translation Table. This
export file can then be used as input to other programs, such as Spreadsheets,
Databases and Word-processors. This gives you the flexibility to format
reports, etc. in ways not otherwise available in HiFinance.
DISCUSSION: When you choose this option,
you will be presented with a menu of sort options. The screen will appear as
follows:
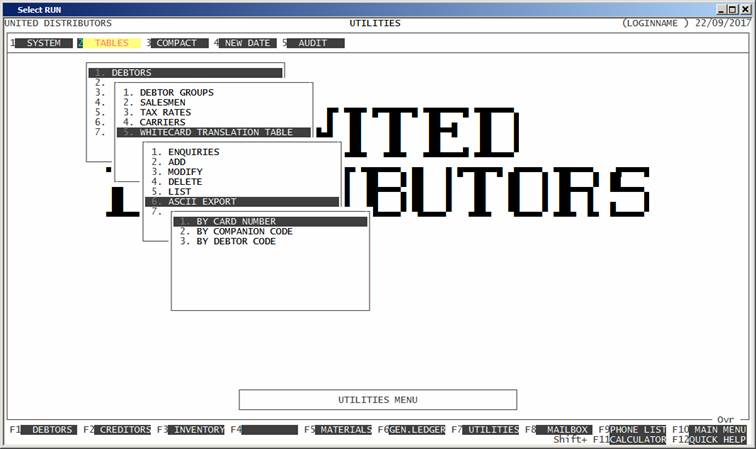
Choose a sort option.
Next you will be asked, INCLUDE ALL WHITECARDS? If you enter Y all Whitcards on file will be printed and no further questions will be
asked. (Go to the START REPORT question.) If you press <ESC> you will return to the WHITECARD TRANSLATION MENU.
If you enter N to the above question, the
following series of questions will appear:
WHITECARD CODE RANGE This is the upper and lower limits of the WhiteClass
code. If you leave the range as blank to zzzzzzzzzzzzzzz, all records will be
included.
COMPANION CODE RANGE This is the upper and lower limits of the old
Companion code. If you leave the range as blank to zzzzzzzzzzzzzzz, all records will be included.
DEBTOR CODE RANGE This is the upper and lower limits of the Debtor
code. If you leave the range as blank to zzzzzzzzzzzzzzz, all records will be
included.
At each point when answering the above questions,
you can press <ESC> and the program will reset
and return you to the WHITECARD
TRANSLATION MENU.
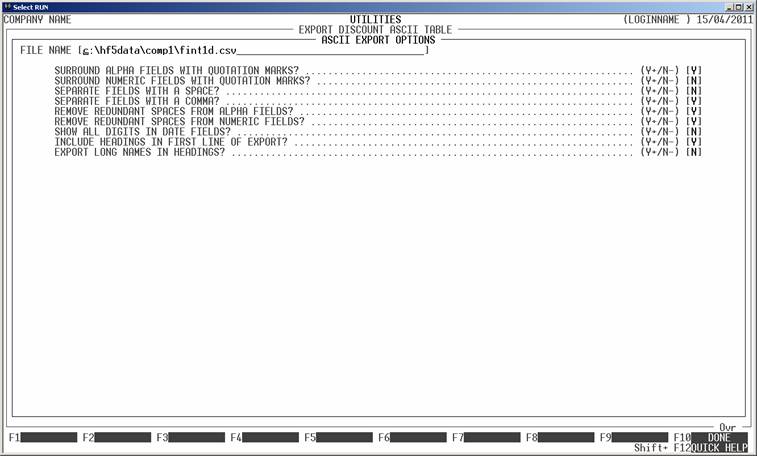
Next you will be asked for the export file name and
options. A full explanation of the fields may be found in FORMATTING ASCII
EXPORT FIELDS (see SECTION B).
If you are using the export function for the first time, you are strongly
encouraged to view this section of the manual. To end this page, press <F10> or <Enter> past the last option. You
will next be presented the following screen:
This screen relates to the exact fields you wish to export.
The top of this screen displays the file name you will be exporting, as a
reminder. The centre portion of the screen displays the short name of each
field available for export. Next to this is a longer, more descriptive name
(which can be exported instead of the short-name). On the right-hand-side is
either a Y or N. If the field has a Y, the field will be included
in the export. If the field has an N, the field will not be
exported. You must choose at least one field to export. You may use the cursor
keys to view all fields, as you would in search screens. You can change the INCLUDE column by moving the highlight bar to the relevant
field and entering a Y or N (or + or -). The bottom of the screen displays the number of fields you have chosen
and the total possible number of fields.
There are also function keys available for
manipulating FIELD NAMES:
<F1> This will only be available is the current field is
not being exported. Pressing <F1> will change INCL status to Y.
<F2> This will only be available is the current field is
being exported. Pressing <F2> will change INCL status to N.
<F4> This will return you to the FILE NAME and OPTIONS entry screen.
<F5> This will only be available if at least one of the
fields has been excluded from the export. Pressing this key will change all
fields to Y.
<F6> This will only be available if at least one of the
fields has been included in the export. Pressing this key will change all
fields to N.
<F8> This will restore the field choices to the state
that they were before you entered the program.
<F10> When you have finished choosing the fields you wish
exported, press <F10> to start the export
process. This option will not be available unless at least one field has been
chosen for export.
When you have entered all the above information,
press <F10> and you will be asked START FILE CREATION? If you answer N, the
program will reset and return you to the WHITECARD
TRANSLATION MENU. If you enter Y, the screen will clear and
the Whitecard Translation Table will be read in. During this time the computer
will be selecting records according to the selection criteria you have just
entered will start writing the selected fields to the export file.
Like other reports, it is possible to stop the
export of the ASCII file by pressing <ESC>. However, the ASCII file
will have been created up to the point where you stopped it.
When the report has completed, HiFinance will return
you to the WHITECARD TRANSLATION TABLE
MENU.